


SiteWorx
-
How to access my SiteWorx account
Introduction
SiteWorx is the control panel that lets you manage your hosting account: email, domains, databases, and website files. To get started, you need to log in with your username and password through the correct URL.
Step 1 – Locate the login URL
-
Open your browser and go to:
Note. If you see a non-private connection error, you can ignore it and continue.
-
Additionally, you can access your Siteworx account through your account manage.cyberglobalnet.com
-
Always use HTTPS for a secure connection.
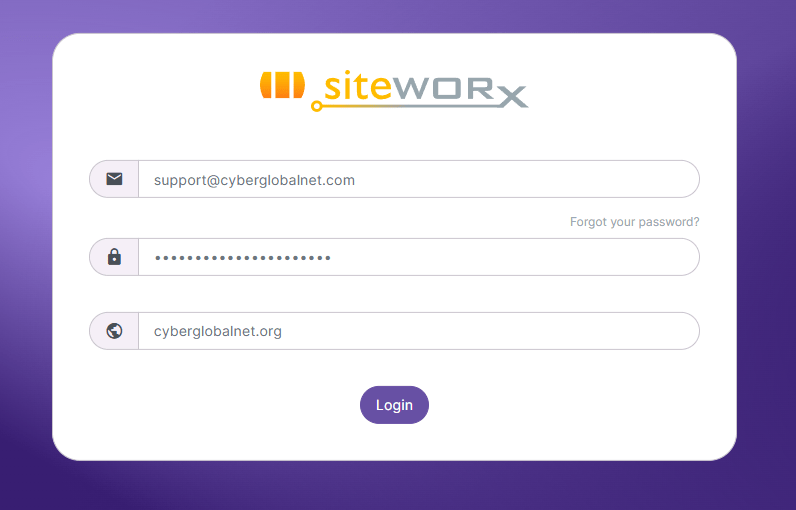
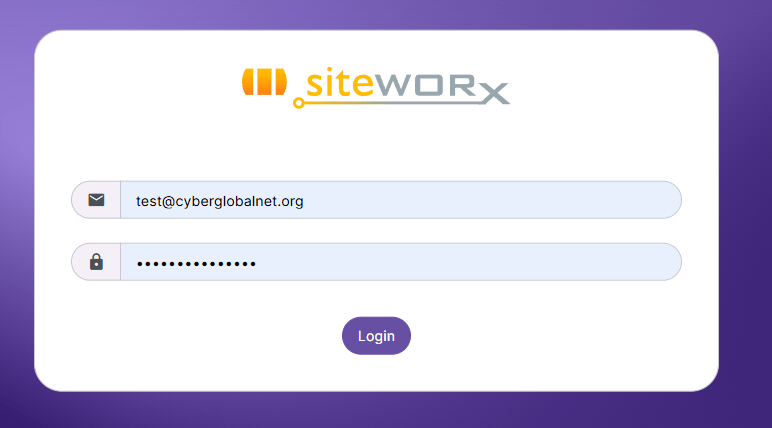
Step 2 – Enter your credentials
-
On the login screen, type your username and password.
-
These details are provided in your hosting activation email.
-
Click Login.
Step 3 – Confirm access
-
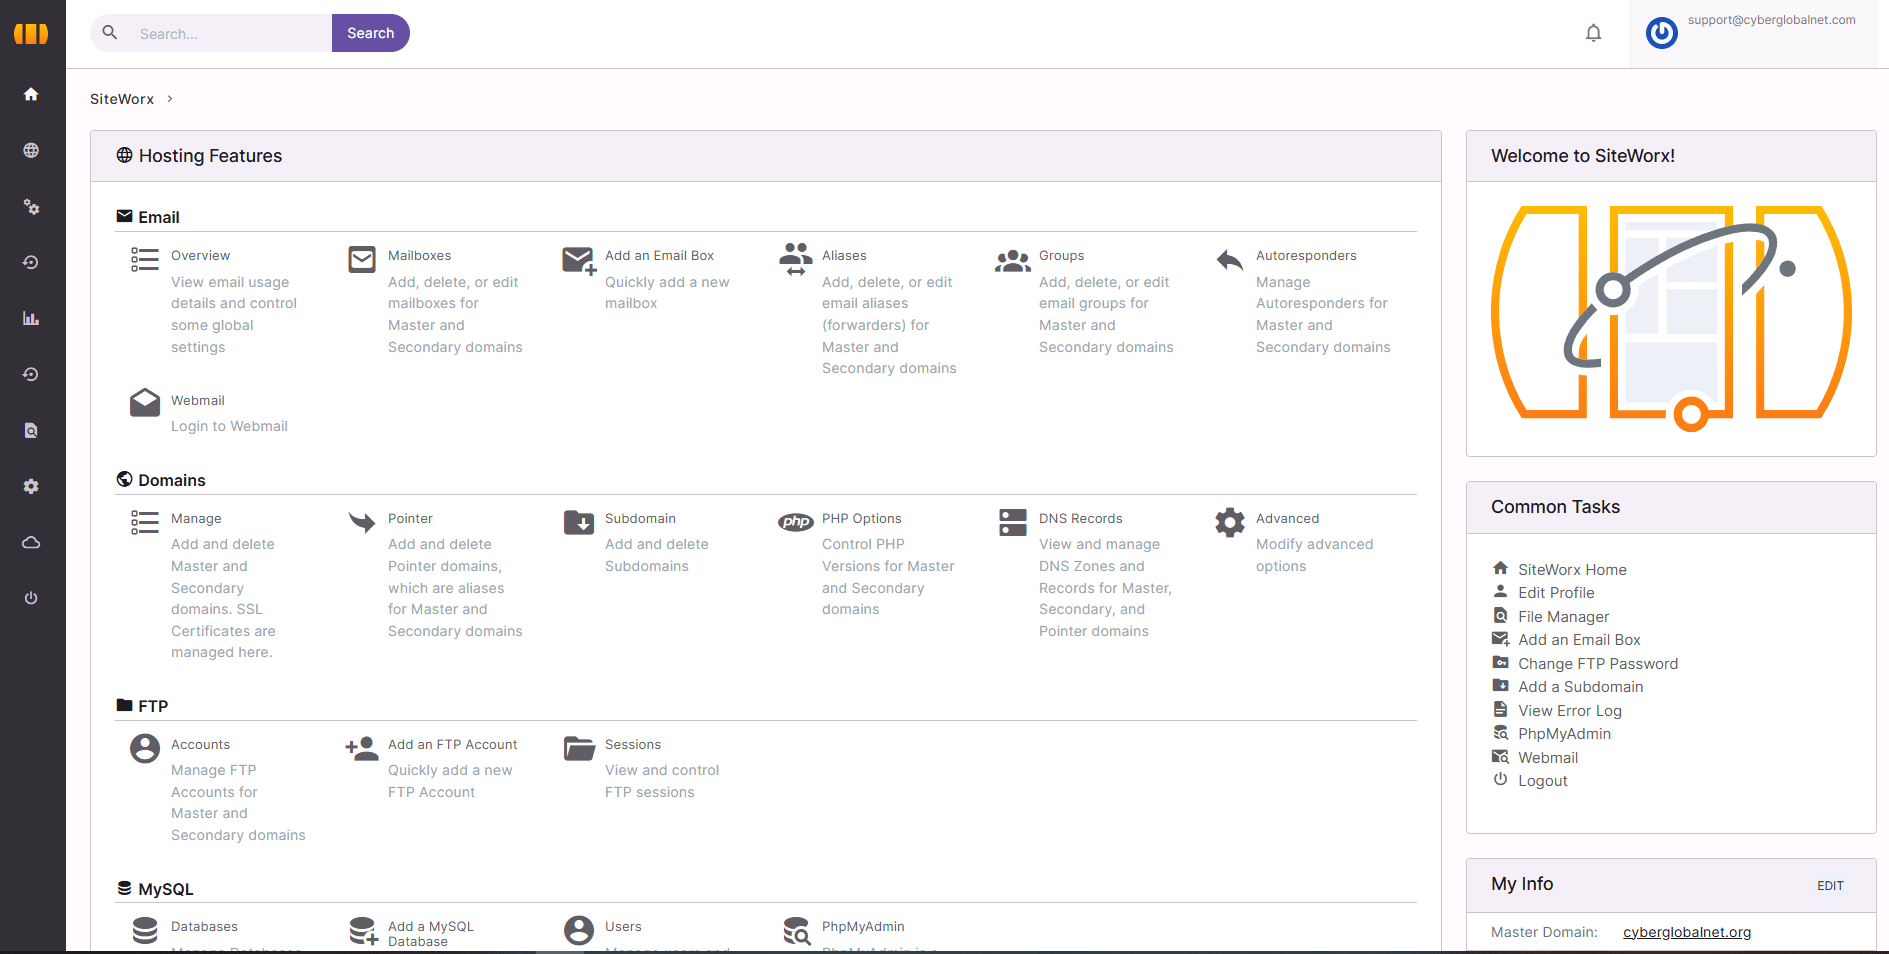
If the details are correct, you’ll be redirected to the SiteWorx dashboard.
-
You’ll see sections such as Domains, Email, Databases and more.
Security recommendations
-
Change your initial password the first time you log in.
-
Use strong passwords: at least 12 characters mixing letters, numbers, and symbols.
-
Never share your credentials via email or insecure messaging.
-
Bookmark your login URL to avoid typing it every time.
-
-
How to Change My SiteWorx Password
Introduction
The SiteWorx interface has been updated, but the process of changing your password remains simple. Here are the latest steps to do it from the control panel.
Step 1 – Log in to SiteWorx
- Accede desde tu navegador a:
Nota. Si ves un error de conexión no privada, puedes ignorarlo y continuar.
-
Además, puedes acceder a tu cuenta de Siteworx a través de tu cuenta en manage.cyberglobalnet.com
-
Enter your current username and password.
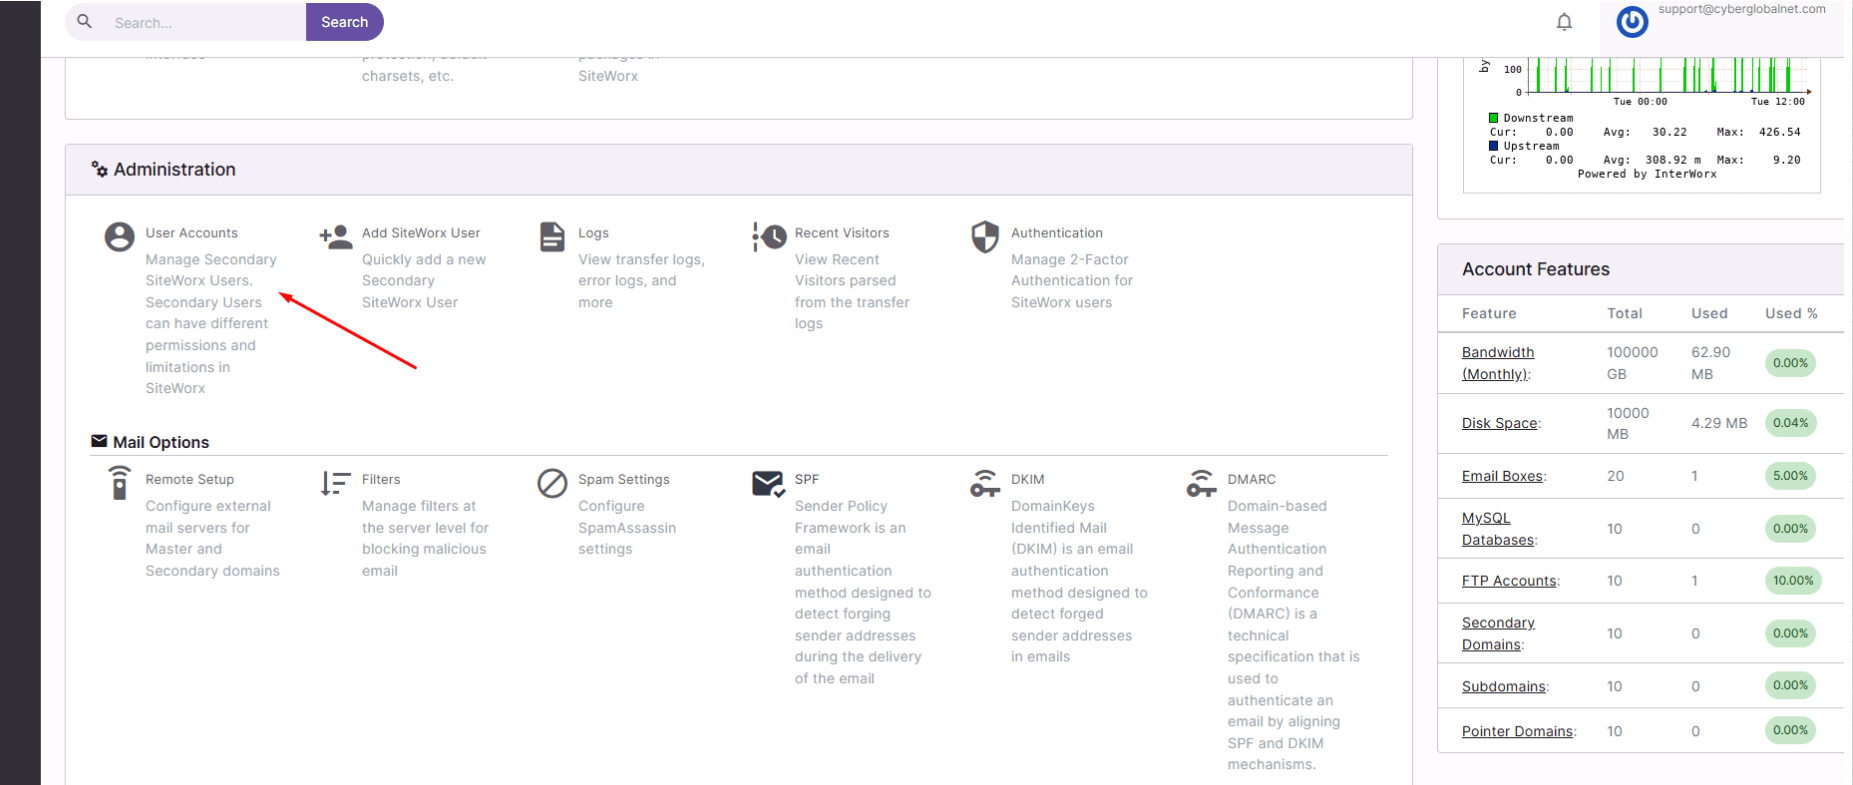
Step 2 – Go to the User Accounts section
-
From the main menu, click Administration.
-
Select User Accounts.
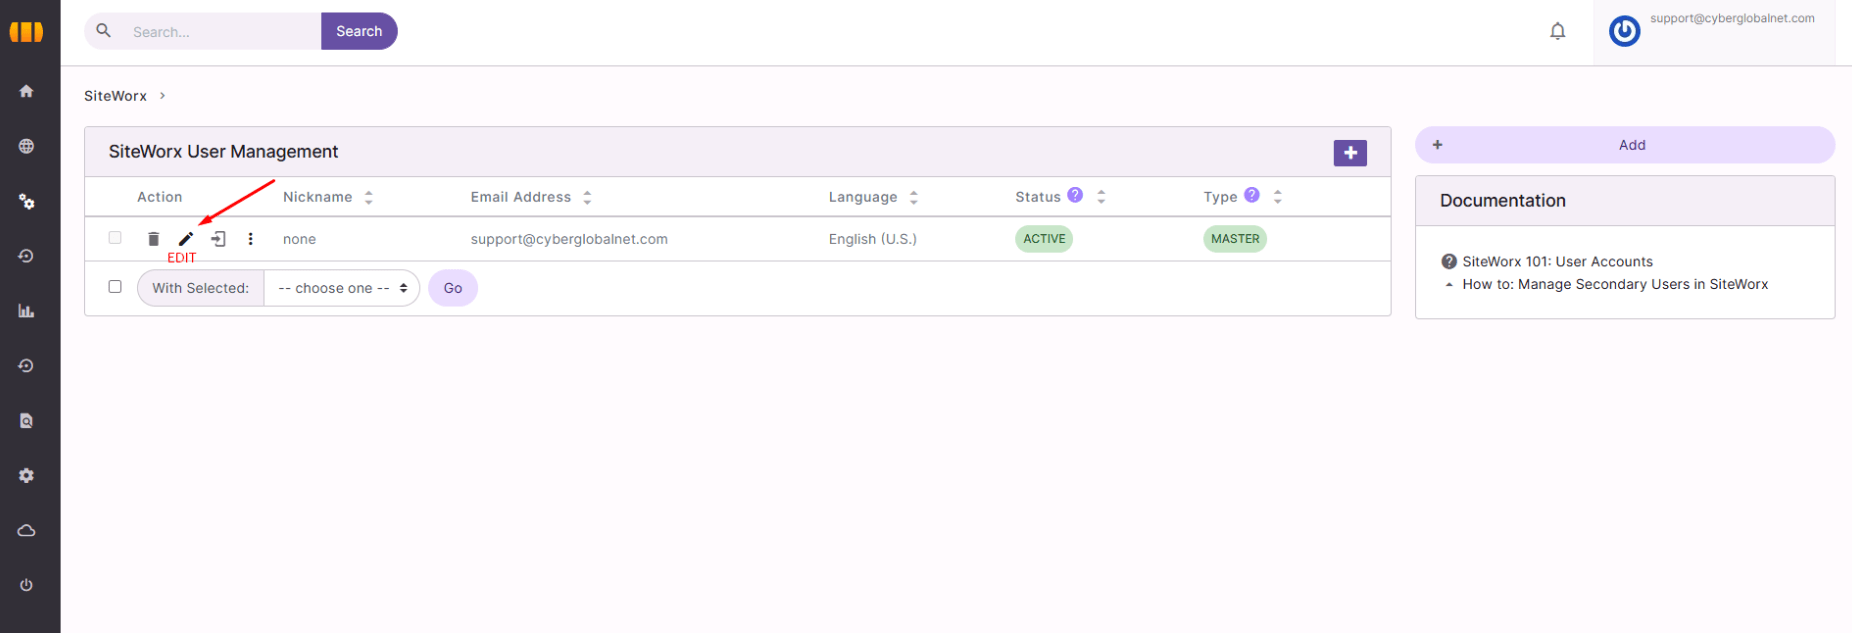
Step 3 – Edit your main user
-
Inside User Accounts, locate your main SiteWorx user.
-
Click Edit (or the settings icon).
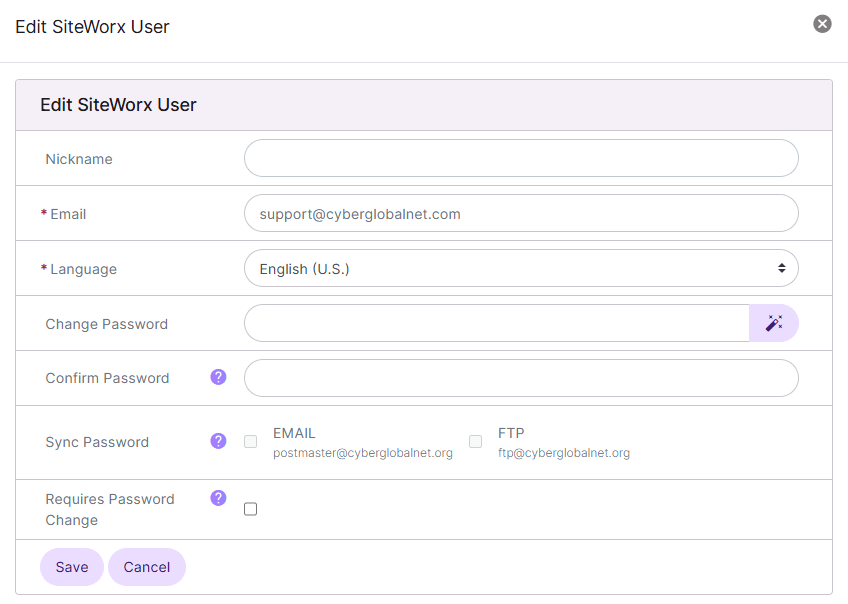
Step 4 – Change the password
-
The edit form for your user will open.
-
Find the Password field.
-
Enter your new password and confirm it in Confirm Password.
-
Click Save to apply the changes.
Security recommendations
-
Use at least 12 characters with a mix of letters, numbers, and symbols.
-
Avoid reusing old passwords from this account.
-
For extra protection, enable 2-Factor Authentication from the Authentication menu.
-
How to Create an Email Address in SiteWorx
Introduction
From the SiteWorx control panel, you can easily create custom email accounts under your domain.
Step 1 – Log in to SiteWorx
Access your panel with your username and password:
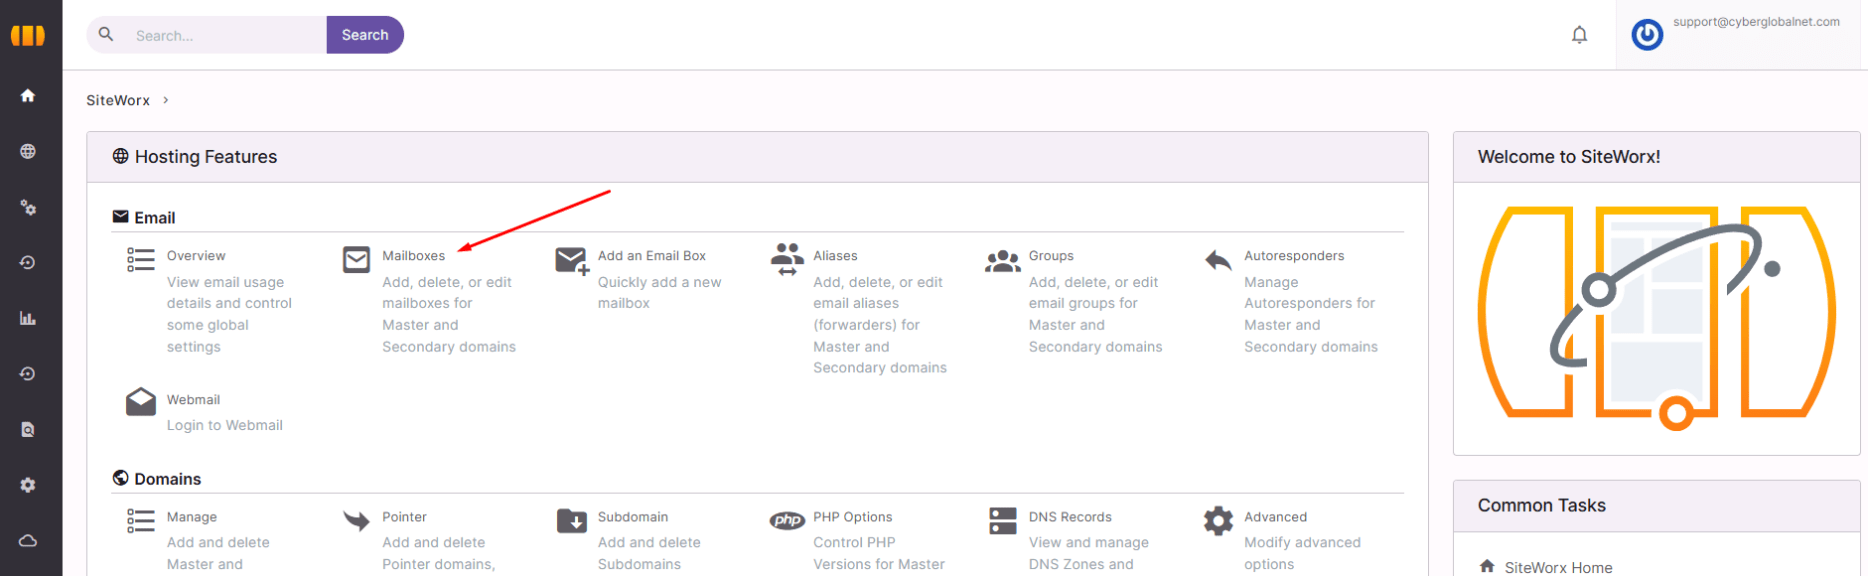
Step 2 – Go to the Email section
In the main menu select:
Hosting Features → Email → Mailboxes
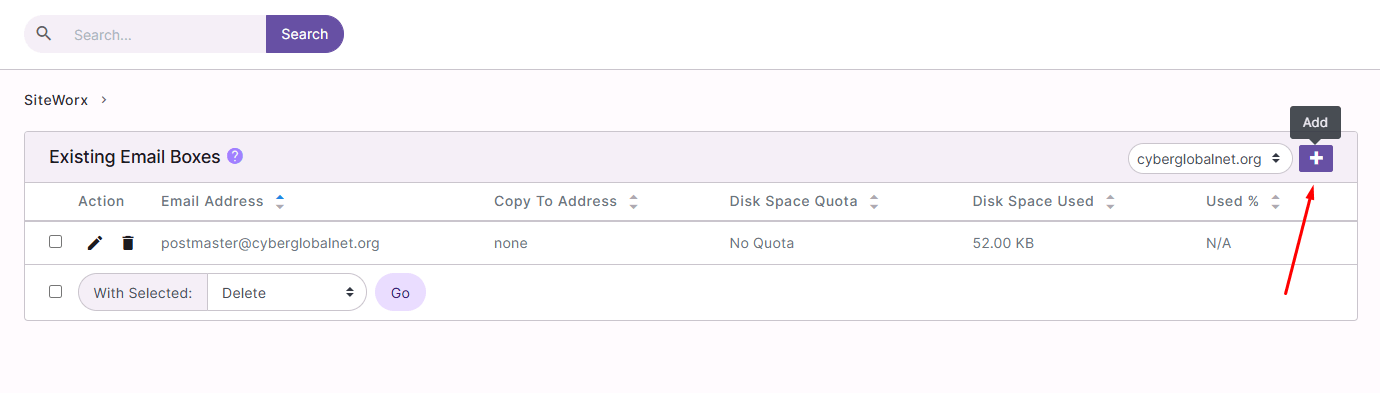
Step 3 – Add a new mailbox
-
Click the “+ Add” button.
-
A form will open to create your new account.
Step 4 – Fill in account details
In the form:
-
Email Address: type the desired address (e.g.,
This email address is being protected from spambots. You need JavaScript enabled to view it. ). -
Password: create a secure password.
-
Confirm Password: re-enter it.
-
(Optional) Set storage limits if needed.
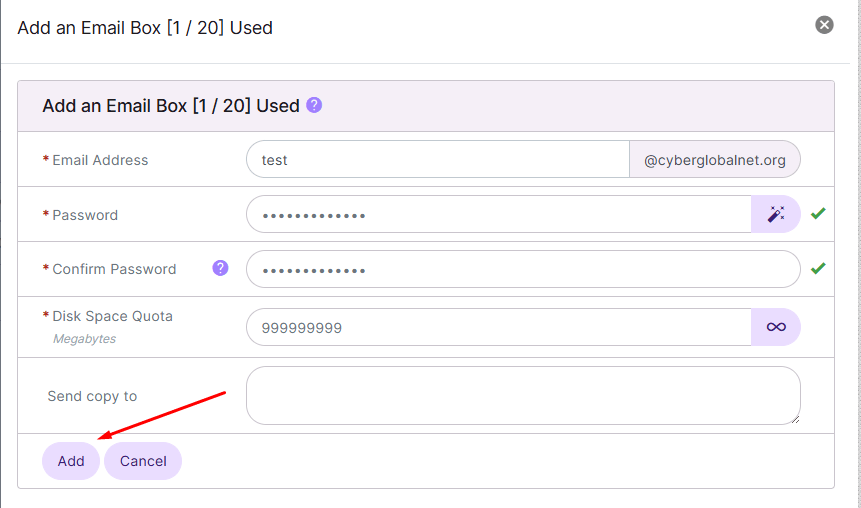
Step 5 – Save the account
Click Add to create the email.
Your new address will now appear in the list of mailboxes.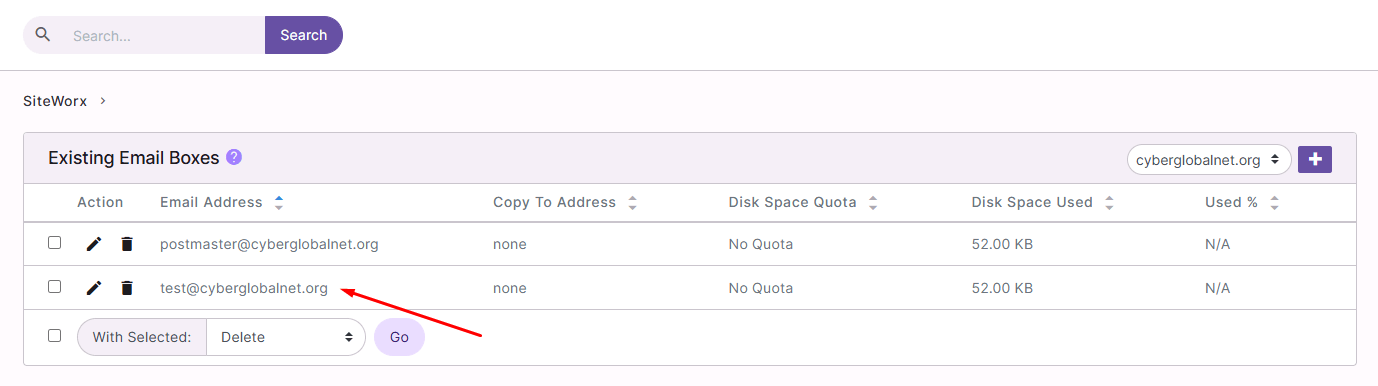
Security recommendations
-
Use at least 12 characters with letters, numbers, and symbols.
-
Create separate accounts for support, sales, and admin.
-
Monitor your mailbox storage regularly.
-
-
How to Change My Email Password in SiteWorx
Introduction
If you forgot your email password or want to update it for security reasons, you can easily change it from SiteWorx.
Step 1 – Log in to SiteWorx
Access the panel with your username and password:
Step 2 – Go to the Email section
From the main menu, select:
Hosting Features → Email → Mailboxes
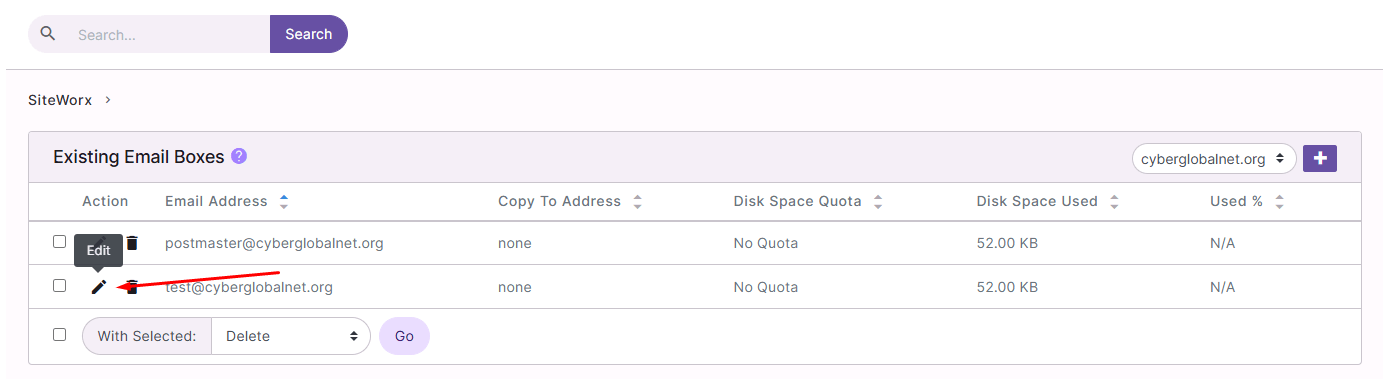
Step 3 – Edit the existing account
-
In the mailbox list, locate the email address you want to update.
-
Click Edit (or the settings icon).
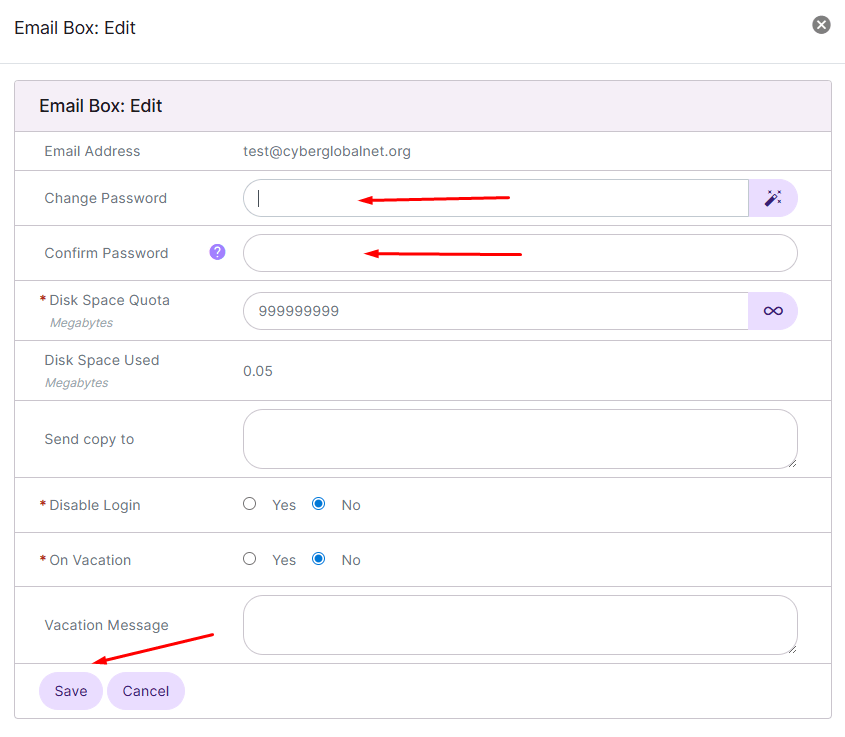
Step 4 – Update the password
-
In the edit form, find the Password field.
-
Enter the new password.
-
Confirm it in Confirm Password.
-
Click Save to apply the changes.
Security tips
-
Use a strong password (at least 12 characters with letters, numbers, and symbols).
-
Avoid reusing old passwords.
-
Change your password periodically for extra protection.
-
-
How to Set Up My Email in Outlook, Gmail, or Other Clients
Introduction
You can connect your SiteWorx email account to Outlook, Thunderbird, Apple Mail, or even the Gmail app on your phone. All you need are the IMAP/POP3 and SMTP settings.
General configuration parameters
-
Incoming Mail (IMAP):
-
Server:
mail.yourdomain.com -
Port:
993 -
Security: SSL/TLS
-
-
Incoming Mail (POP3):
-
Server:
mail.yourdomain.com -
Port:
995 -
Security: SSL/TLS
-
-
Outgoing Mail (SMTP):
-
Server:
mail.yourdomain.com -
Port:
465(or 587 if needed) -
Security: SSL/TLS
-
-
Username: your full email address (example:
This email address is being protected from spambots. You need JavaScript enabled to view it. ) -
Password: your email account password
Quick setup in Outlook
-
Open Outlook and go to File → Add Account.
-
Enter your full email address.
-
Select Manual setup → IMAP or POP.
-
Enter the parameters above.
-
Save and test the connection.
Setup in Gmail app (Android/iOS)
-
Open Gmail → Settings → Add Account.
-
Choose Other.
-
Enter your email address.
-
Select IMAP and enter the incoming/outgoing server details.
-
Save changes.
Recommendation
Whenever possible, use IMAP, as it keeps your emails synchronized across all devices. POP3 only downloads them to one device.
-
-
How to Access My Email via Webmail
Introduction
Webmail lets you access your email from any browser, without installing additional software.
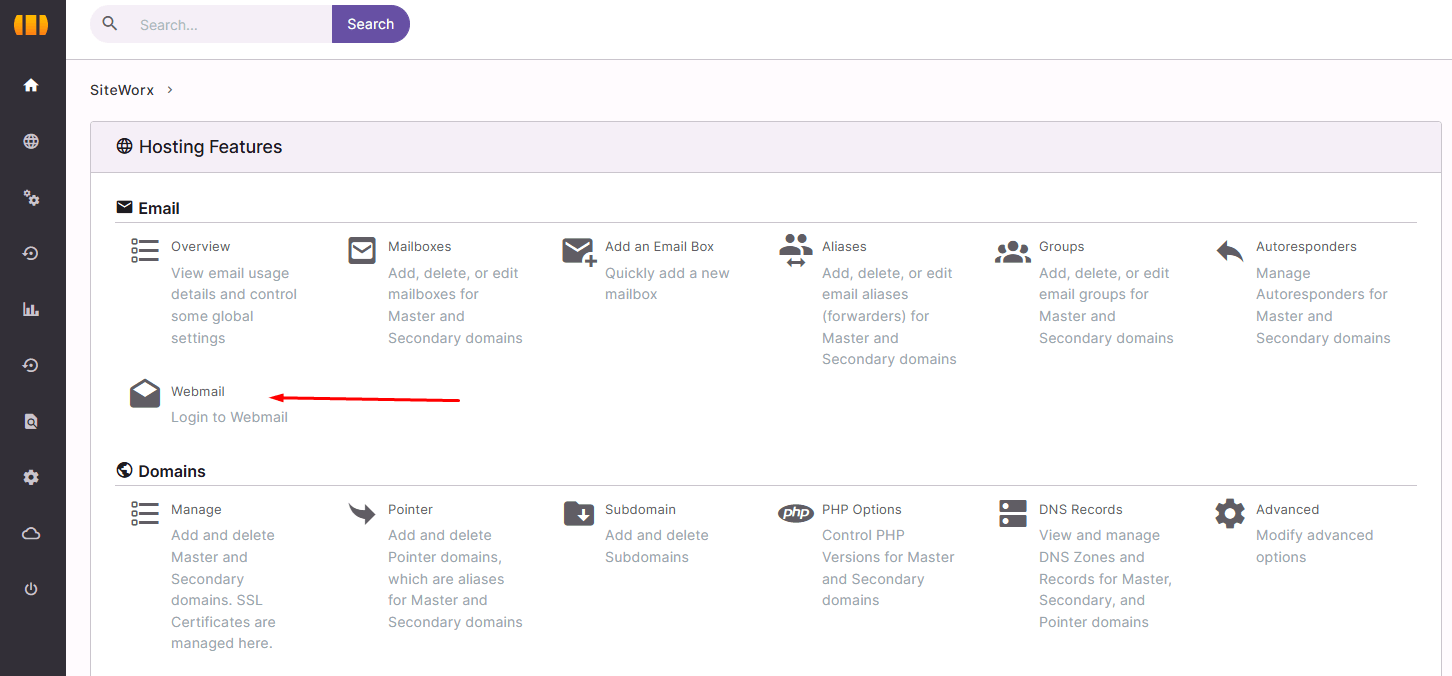
Step 1 – Open the Webmail URL from within SiteWorx
-
Log in to SiteWorx.
-
In the main menu, go to Hosting Features → Email.
-
Click Webmail (Login to Webmail).
Step 2 – Enter Your Credentials
On the login page enter:
-
Username: your full email address (e.g.,
This email address is being protected from spambots. You need JavaScript enabled to view it. ) -
Password: your account password
Click Login.
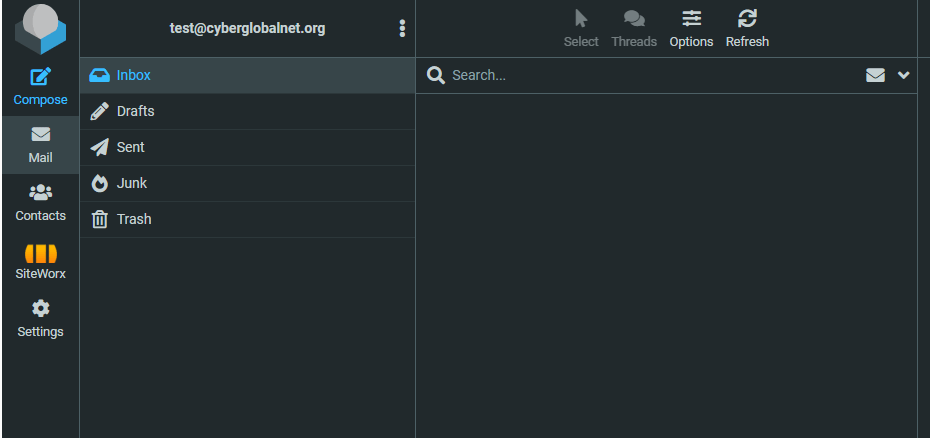
Step 3 – Access Your Inbox
Once logged in, you’ll be able to use the webmail client (e.g., Roundcube) to manage your emails from your browser.
Recommendations
-
If you forgot your password, reset it from SiteWorx → Mail Options → Edit.
-
Always log in with https:// for security.
-
-
How to Create a MySQL Database
Introduction
From SiteWorx you can create MySQL databases to install apps like WordPress, Joomla, or custom systems.
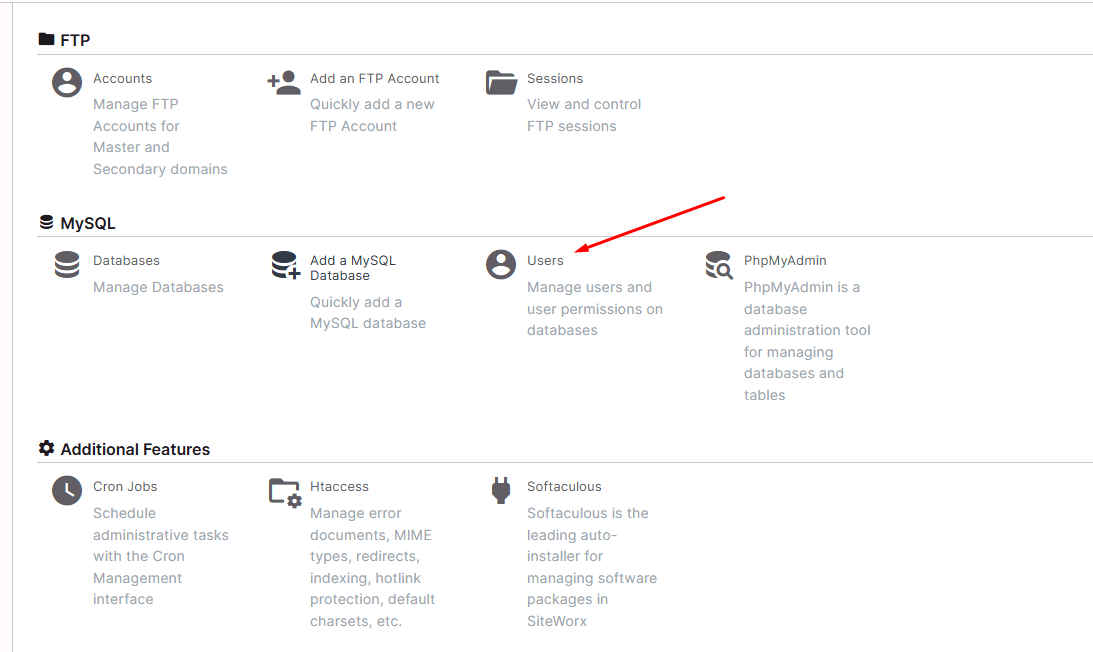
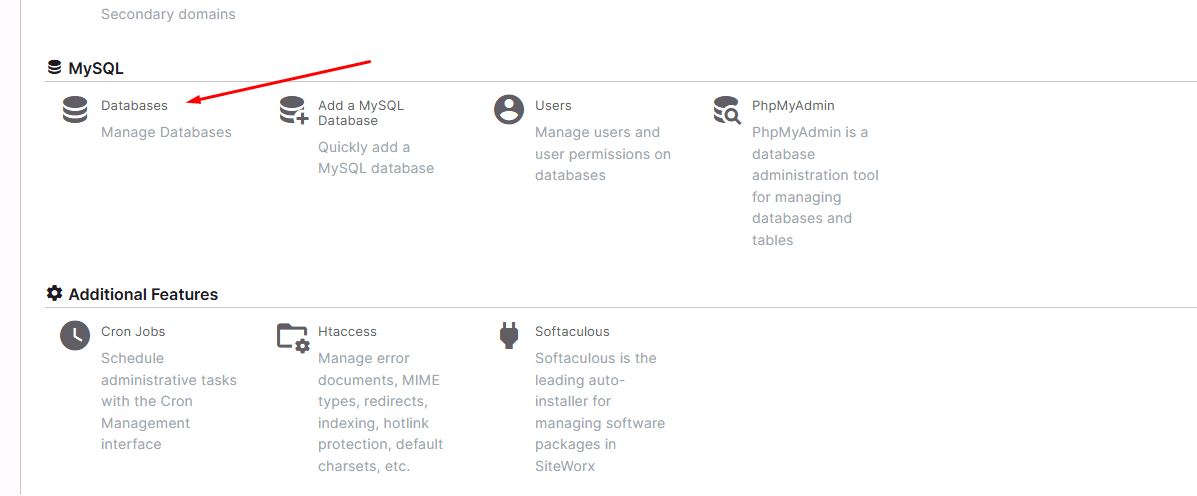
Step 1 – Access the MySQL section
Log in to SiteWorx and go to:
Hosting Features → MySQL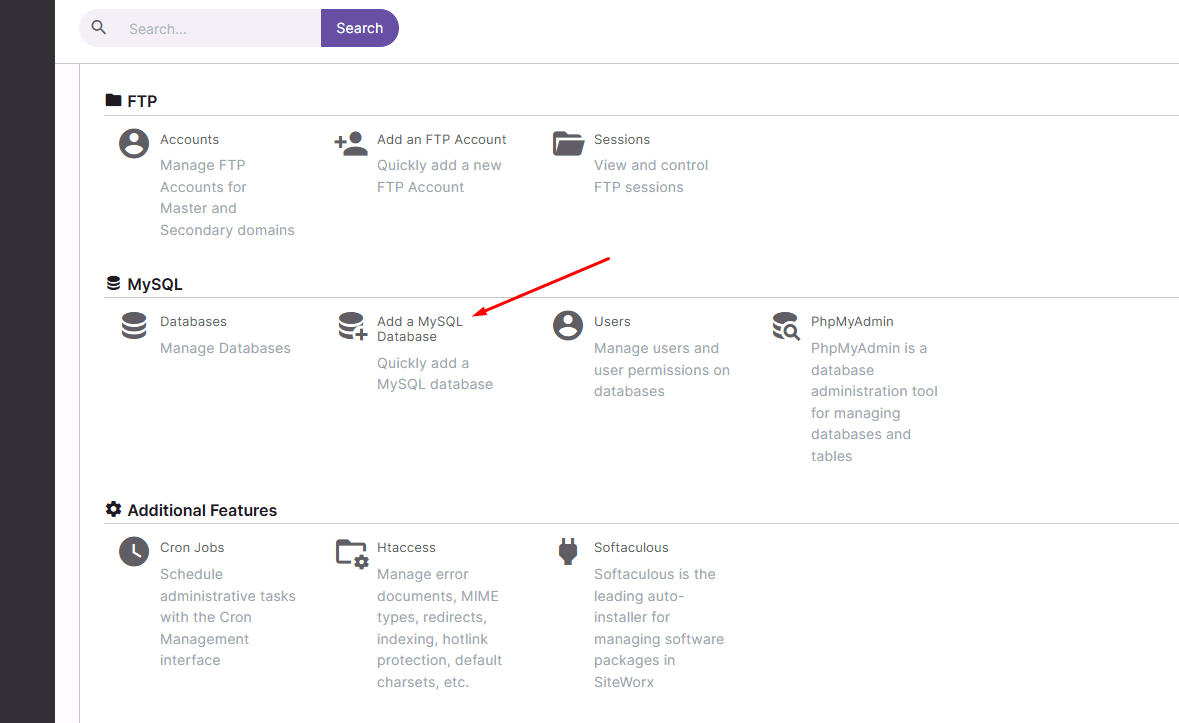
Step 2 – Create the database
Click Add a MySQL Database.
-
Enter the database name.
-
Confirm to create it.
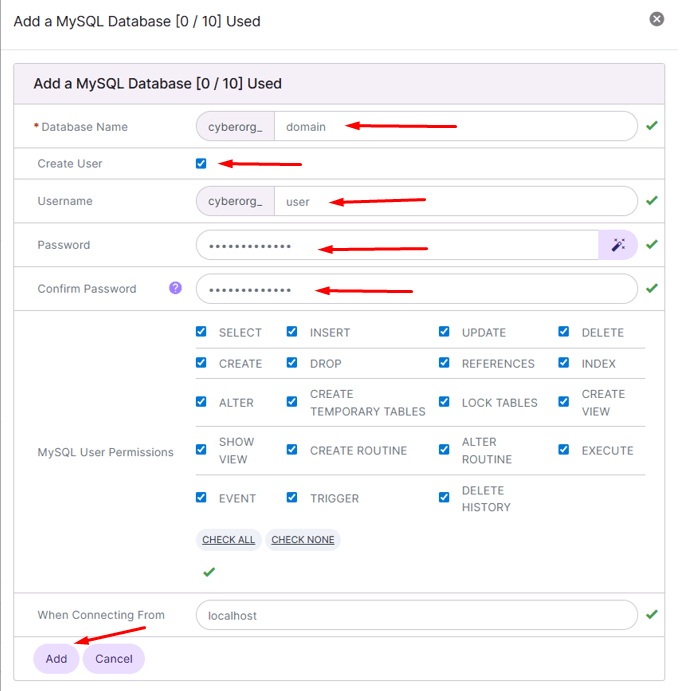
Note: You must check “create user,” otherwise you will not be able to create a database.
Step 3 – Verification
The database will appear in the list of available ones.

Recommendations
-
Use short, clear names to identify the DB.
-
Assign one database per app for better security.
-
-
How to Create a Database User and Assign It
Introduction
Every database requires a user with permissions to access and manage its content. From the SiteWorx control panel, you can create users and assign them to an existing database.
Step 1 – Access the MySQL Users Section
Go to SiteWorx → MySQL → Users
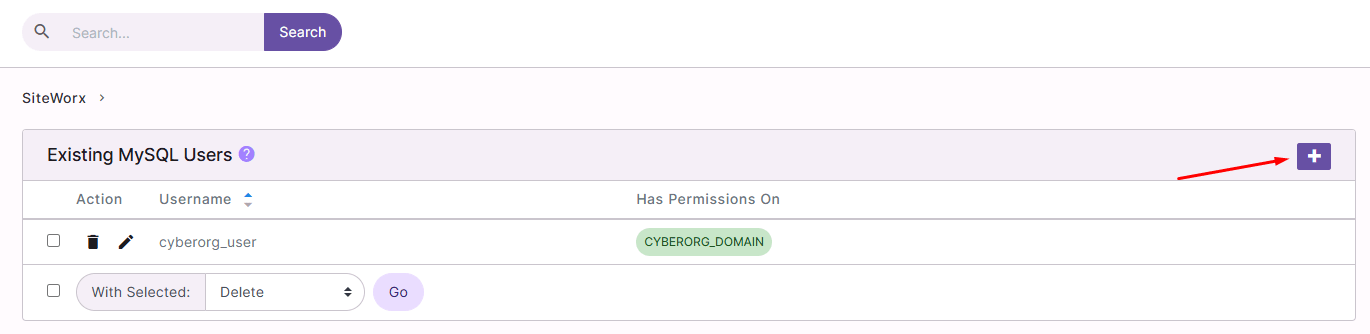
Step 2 – Create a New User
Click Add +.
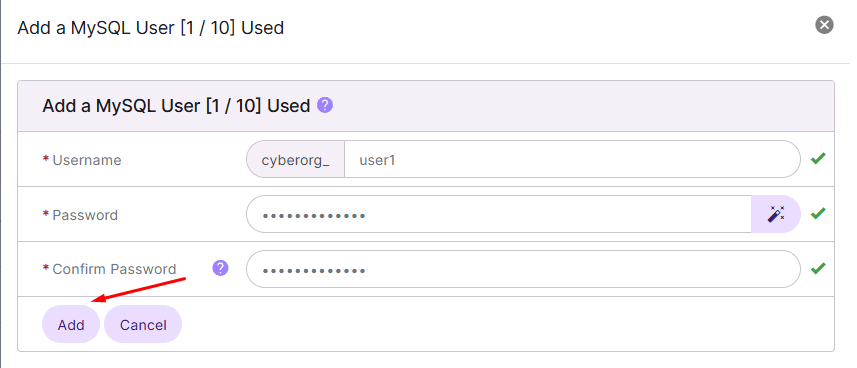
Step 3 – Fill in the Form
Enter:
-
Username: the name of the user who will have access
-
Password: the password for the user
-
Confirm Password: repeat the password
Click Add to create the user.
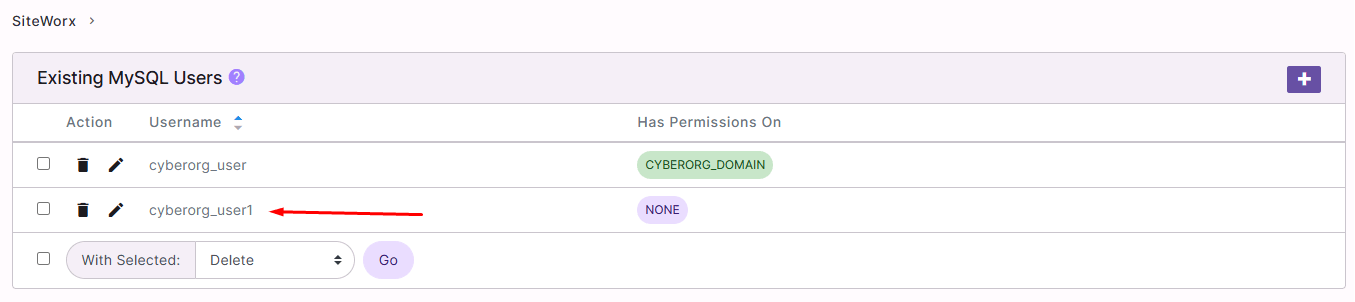
Step 4 – Verification
The new user will appear in the available list.
Step 5 – Access the Databases Section
In SiteWorx, go to:
Hosting Features → MySQL → Databases
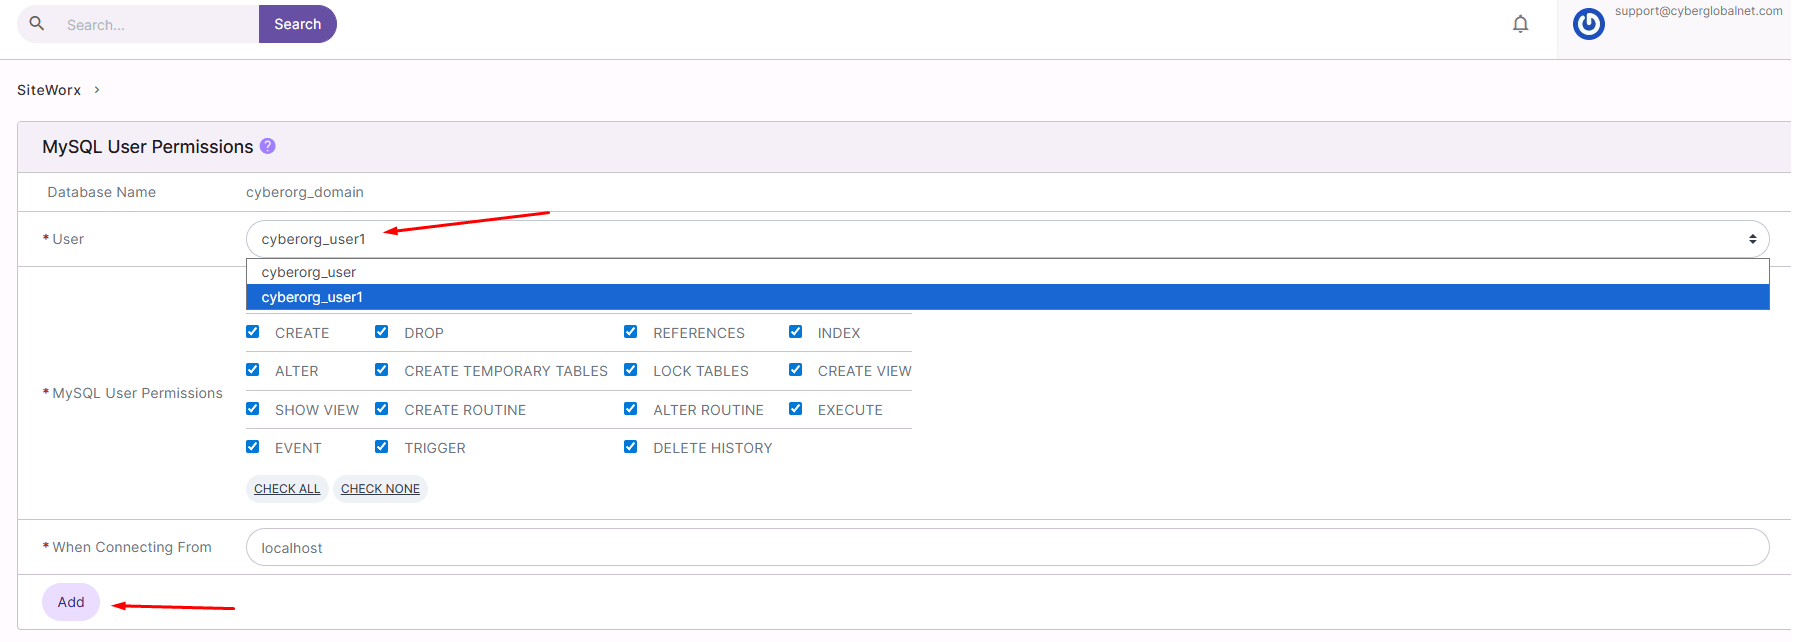
Step 6 – Assign the User to a Database
In the Existing Database section, click on the Manage Users icon.

Step 7 – Select the User
Select the newly created user and click Add to assign it.
Recommendations
-
Use strong passwords to secure access.
-
Only grant permissions required for the user’s role.
-
-
How to upload files to my site using the File Manager
Introduction
The integrated File Manager in SiteWorx allows you to manage your website’s content without the need for external programs like FTP. With this tool, you can quickly upload, move, or delete files.
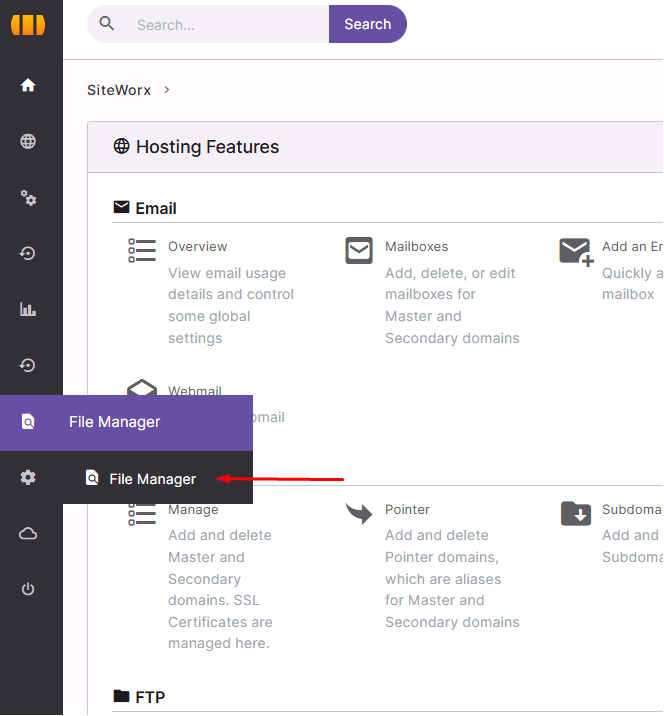
Step 1 – Access the File Manager
In the SiteWorx panel, go to:
Hosting Features → File Manager
You can also access it from the left sidebar menu by selecting File Manager.
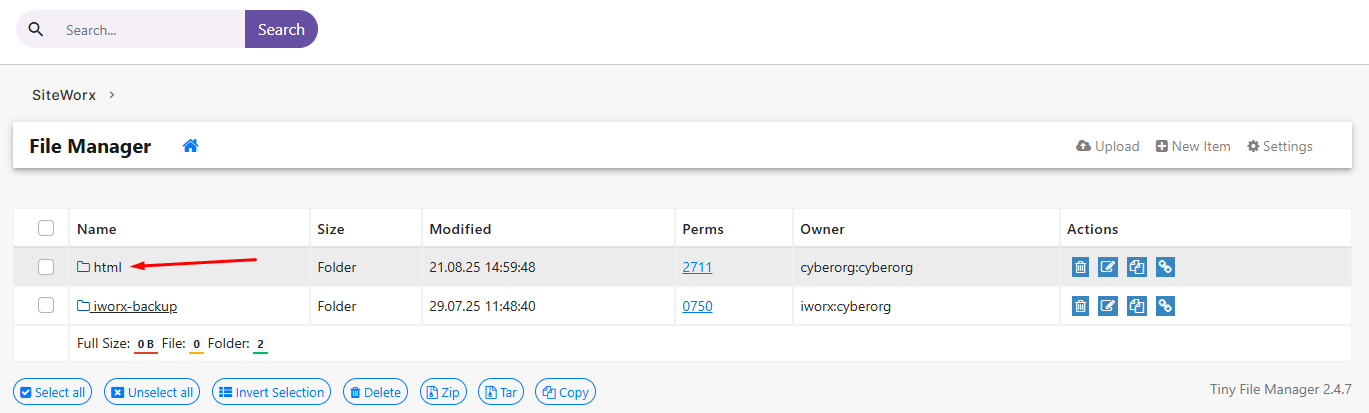
Step 2 – Enter the
htmlfolderClick on the html folder.
This folder is the public directory of your website; everything placed here will be accessible from your domain.
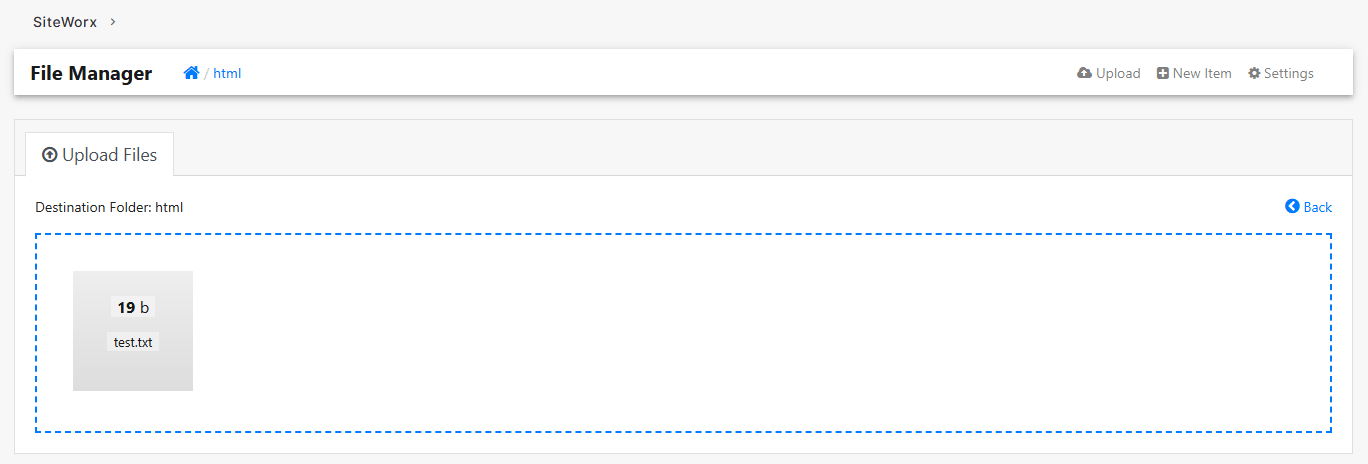
Step 3 – Upload files
- Click the Upload button.
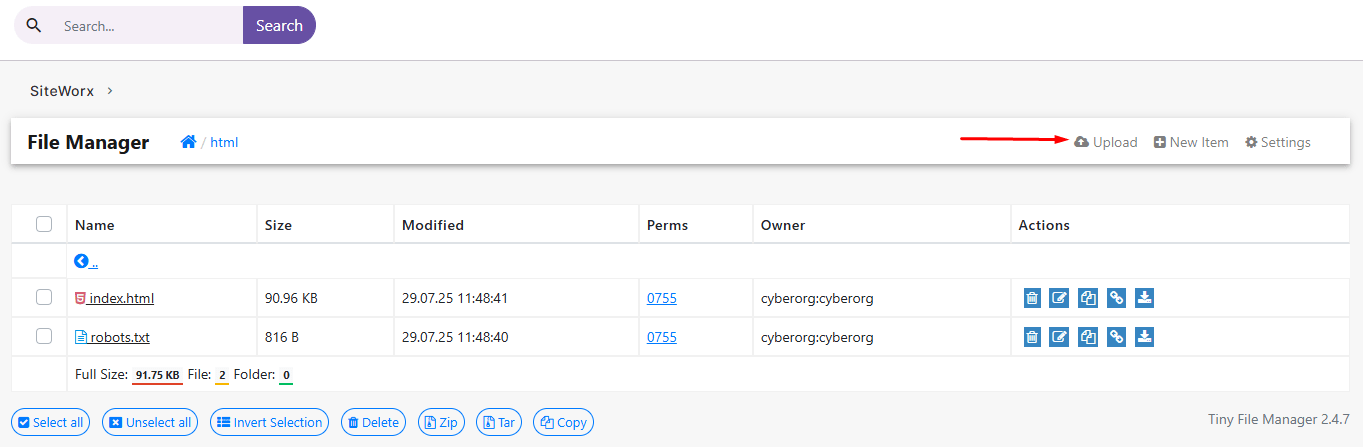
- Select the files from your computer.
-
Wait until the upload is completed.
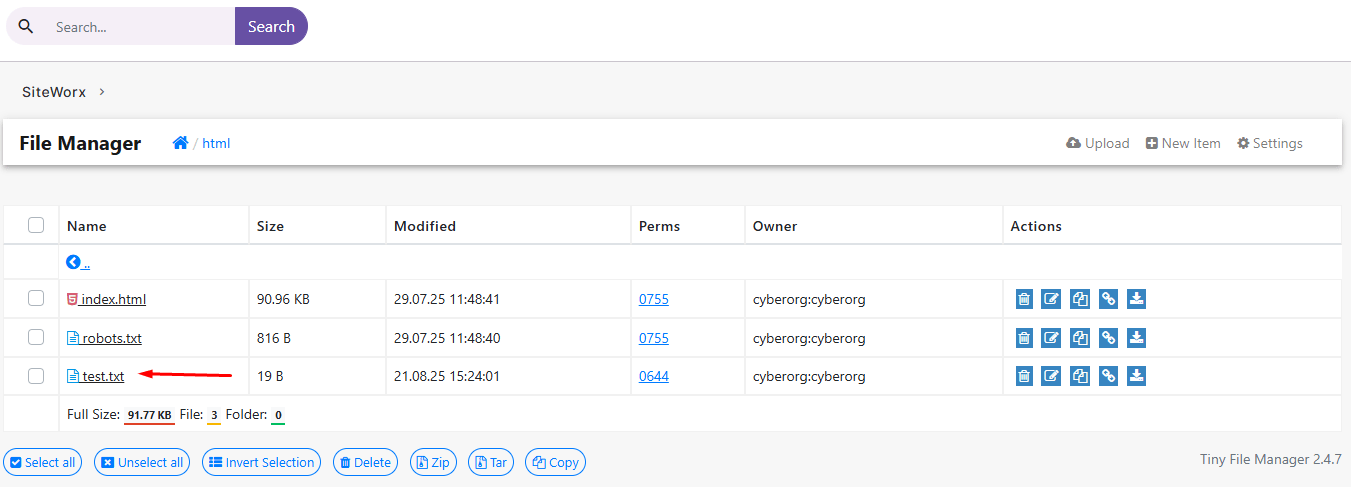
Step 4 – Verify the upload
Once the upload is finished, the files will appear listed in the directory you selected.
Recommendations
-
Upload only the necessary files to avoid saturating your hosting.
-
Keep an organized folder structure (for example:
/html/images/for images). -
If you are replacing an existing file, make sure you have a backup copy.
-
How to Upload Files to My Website Using FTP
Introduction
The FTP (File Transfer Protocol) allows you to transfer files between your computer and your hosting server. By using an FTP client such as FileZilla, you can easily upload, edit, or delete files from your website.
Step 1 – Create an FTP User
-
Log in to your SiteWorx control panel.
-
Go to Hosting Features → FTP → Accounts.
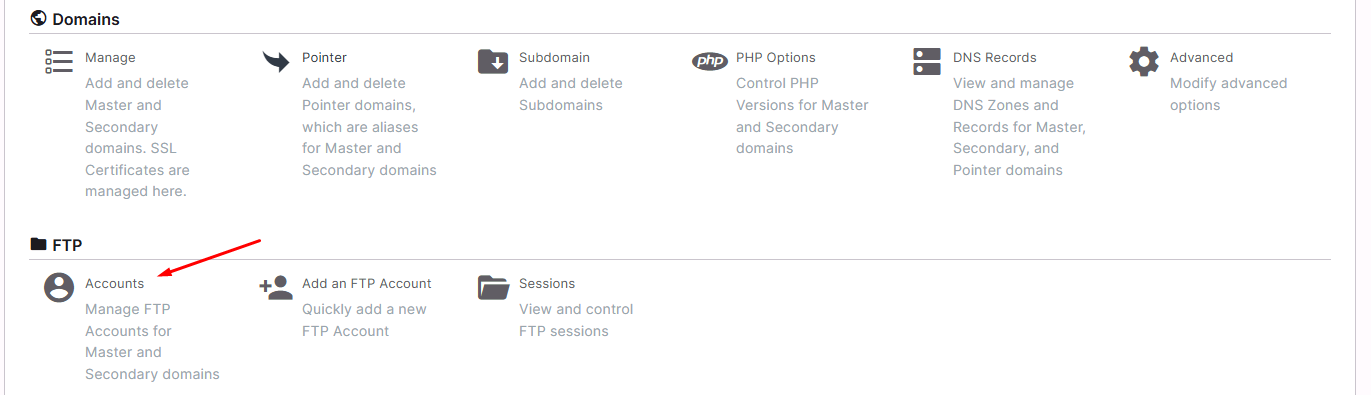
-
Click on Add FTP Account.

-
Enter a username, password, and select the folder this account will access (usually
/html).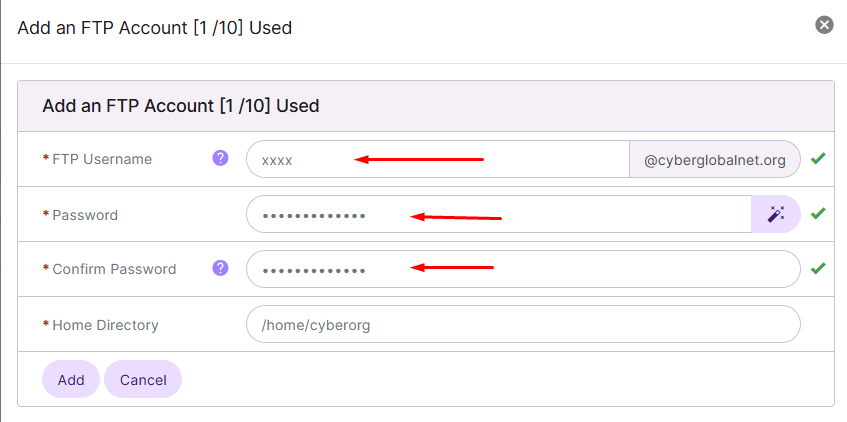
-
Save the changes.
Step 2 – Download and Install FileZilla
-
Visit the official FileZilla website: https://filezilla-project.org
-
Download the FileZilla Client version.
-
Install it on your computer.
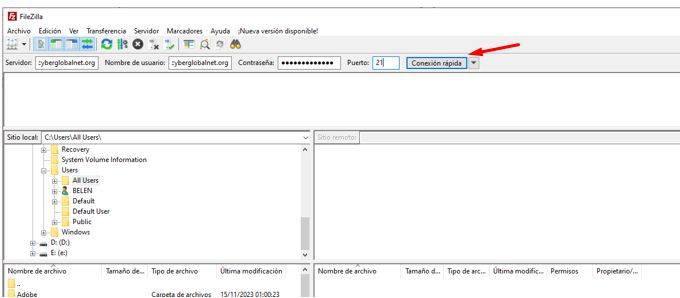
Step 3 – Connect to the FTP Server
-
Open FileZilla.
-
At the top fields, enter the following:
-
Host: your domain name or server IP address.
-
Username: the FTP user created in SiteWorx.
-
Password: the password you assigned.
-
Port: 21 (default FTP port).
-
-
Click Quickconnect.
Step 4 – Upload Files to the Server
-
On the left panel of FileZilla, locate the files on your computer.
-
On the right panel, open the /html folder (the public directory of your site).
-
Drag and drop the files from left (local) to right (server).
-
Wait until the transfer is complete.
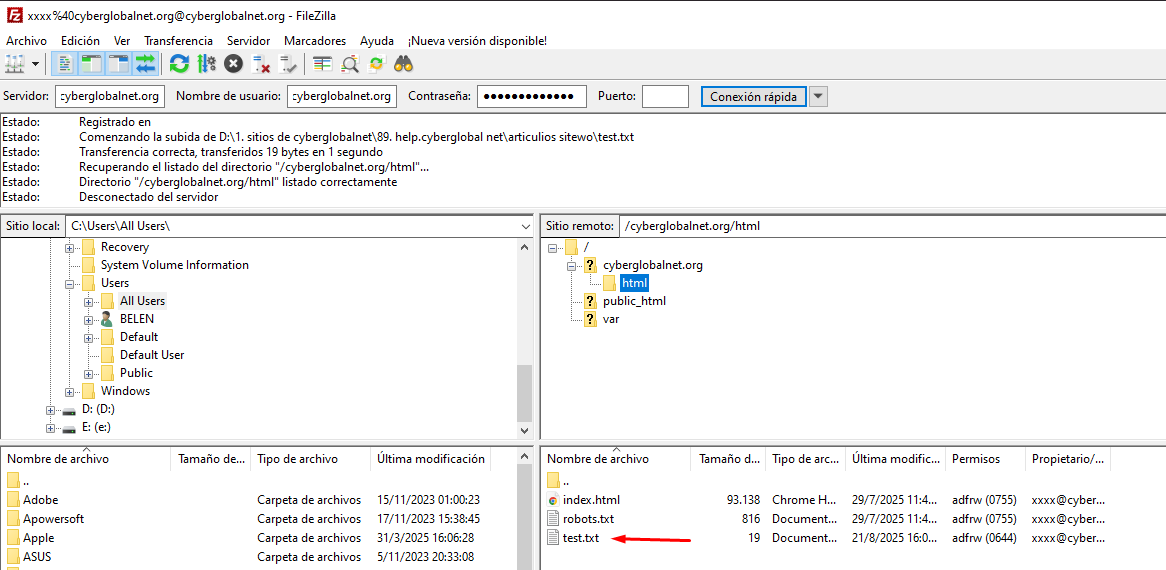
Step 5 – Verify the Upload
Once the transfer is finished, your files will appear in the selected directory and will be accessible through your domain.
Recommendations
-
Use a secure connection (FTPS or SFTP) if your server supports it.
-
Keep your folders organized (e.g.,
/html/css/,/html/images/). -
Always keep a backup copy before replacing files.
-
-
How to Add an Additional Domain or Subdomain
Introduction
In SiteWorx, you can manage multiple domains and subdomains from the same control panel. This allows you to host more than one website or create separate sections within a main domain (for example: xxxxx.newdomain.com).
Step 1 – Access the Domain Management Section
Log in to the SiteWorx panel and go to:
Hosting Features → Domains → Manage

Step 2 – Add an Additional Domain
-
Click on the “+” button (Add Domain).
-
Fill in the required fields:
-
Domain: enter the new domain (e.g., newdomain.com).
-
PHP Version: select the PHP version.
-
IPv4 / IPv6 Address: keep the default shared addresses unless specific settings are required.
-
-
Click Add to save.
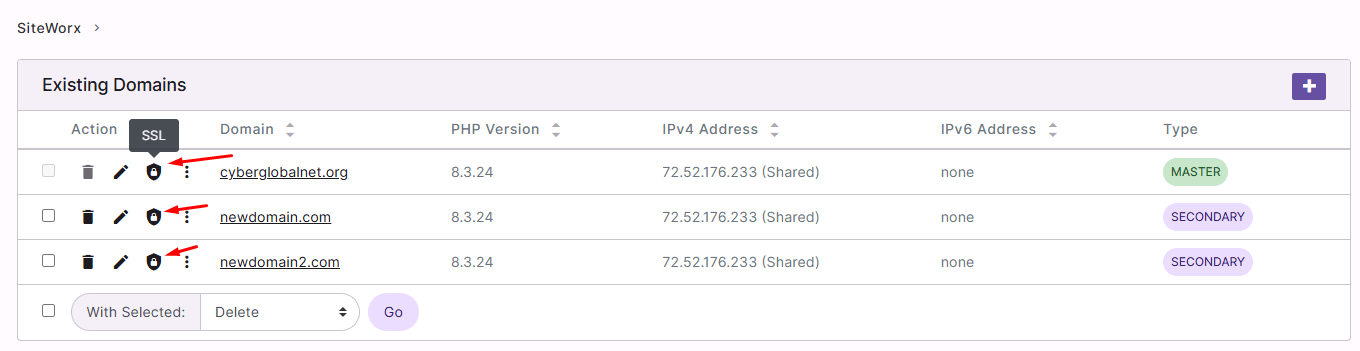
The new domain will appear in the Existing Domains list as Secondary.

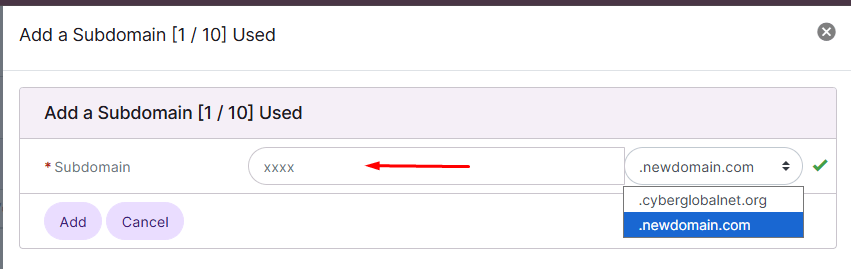
Step 3 – Add a Subdomain
-
Go to Domains → Subdomain and click Add.

-
Enter the subdomain name (e.g., xxxxx → xxxxx.newdomain.com).
-
Choose the domain to associate it with.
-
Click Add.
The subdomain will now be active and ready to use.
Recommendations
-
Use additional domains for complete, standalone websites.
-
Use subdomains for specific sections of a domain (e.g., blog, shop, support).
-
Don’t forget to configure your domain’s DNS from your registrar so it points to your server.
-
-
How to Create Domain or Web Page Redirects
Introduction
Redirects allow you to automatically send visitors from one domain or URL to another. They are useful when migrating a website, changing page names, or consolidating traffic into a main domain.
Step 1 – Access the Redirects Section
In the SiteWorx panel, go to:
Hosting Features → Domains → Pointer

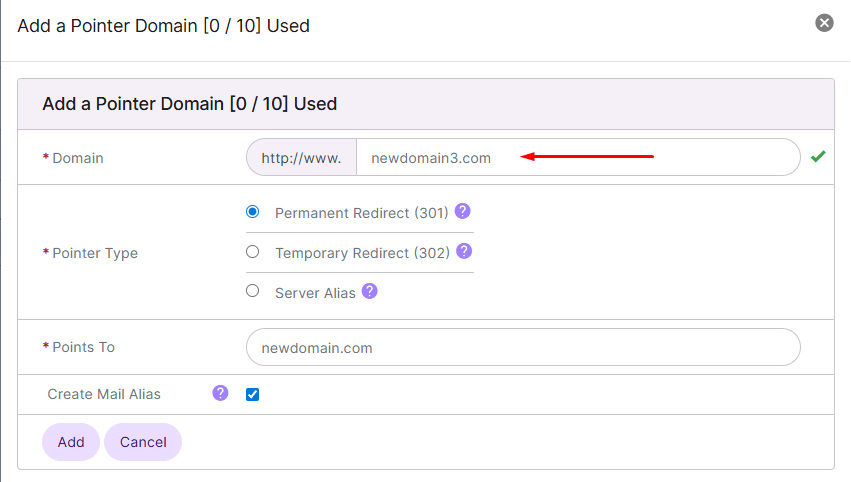
Step 2 – Create a Redirect
-
Click the Add (+) button.
-
In the Domain field, enter the domain you want to redirect.
-
Select the redirect type:
-
Permanent Redirect (301): for permanent redirects.
-
Temporary Redirect (302): for temporary redirects.
-
Server Alias: to use the domain as an alias of the main one.
-
-
In Points To, enter the destination domain.
-
Check Create Mail Alias if you also want to redirect email.
-
Click Add to save.
Step 3 – Verify the Created Redirect
After saving, the redirected domain will appear in the Existing Pointers list.

Recommendations
-
Always use 301 (Permanent) if the redirect is final to maintain SEO ranking.
-
Use 302 (Temporary) only if you plan to revert it later.
-
Make sure the destination domain is active before creating the redirect.
-
-
How to Install an SSL Certificate (Let’s Encrypt)
Introduction
An SSL certificate allows your website to use HTTPS, ensuring encrypted data transmission. With SiteWorx, you can install a free Let’s Encrypt certificate in just a few steps.
Step 1 – Access Domain Management
Go to SiteWorx → Hosting Features → Domains → Manage.
Step 2 – Select the Domain
In the list of existing domains, click the SSL lock icon for the domain where you want to enable HTTPS.
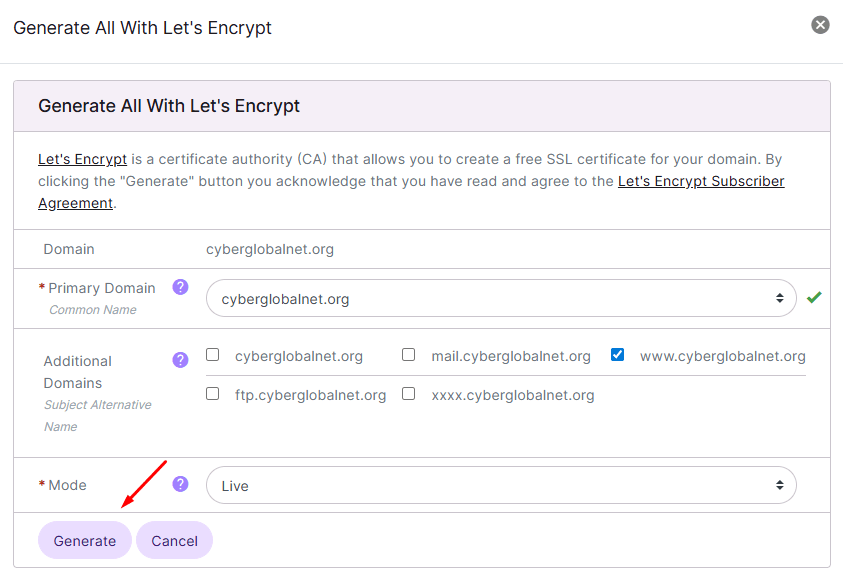
Step 3 – Open Let’s Encrypt
In the SSL section, click the button:
Generate All With Let’s Encrypt

Step 4 – Configure the Certificate
The configuration window will open:
-
Primary Domain: the main domain is selected automatically.
-
Additional Domains: you may include subdomains like www, mail, ftp.
-
Mode: select Live so the certificate is valid in production.
Click Generate.
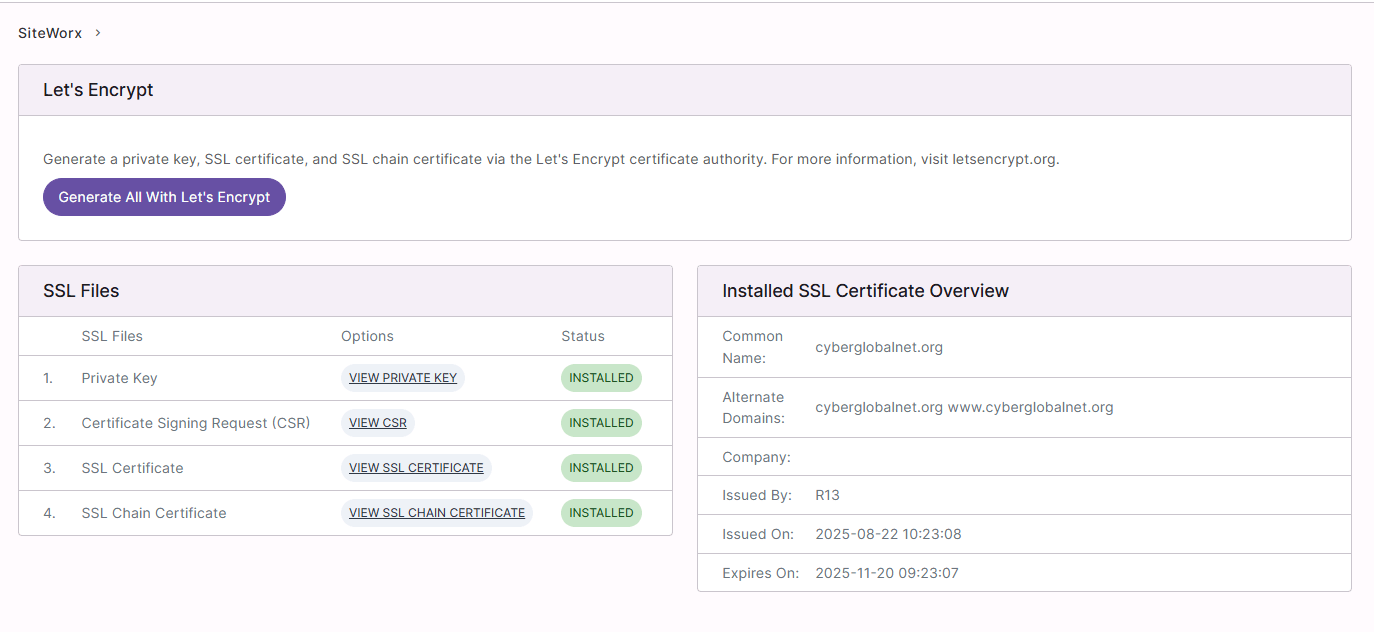
Step 5 – Confirm Installation
Once installed, you will see the generated files (private key, CSR, SSL certificate) and the certificate details in the status section.
Recommendations
-
The free Let’s Encrypt SSL certificate is valid for 90 days. SiteWorx usually renews it automatically.
-
Verify that your site loads correctly with https://.
-
Make sure to redirect all visits from http:// to https:// for better security.
-
-
How to Perform a Backup from SiteWorx
Introduction
Backups are essential to protect your website’s information. From SiteWorx you can generate and download full or partial copies of your files, databases, and configurations.
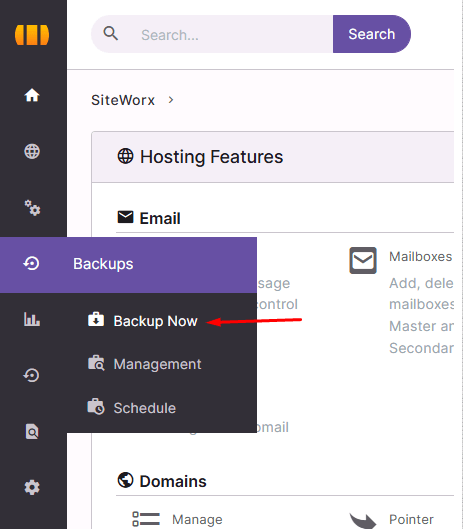
Step 1 – Access the Backups Section
In the SiteWorx panel go to:
Hosting Features → Backups → Backup Now
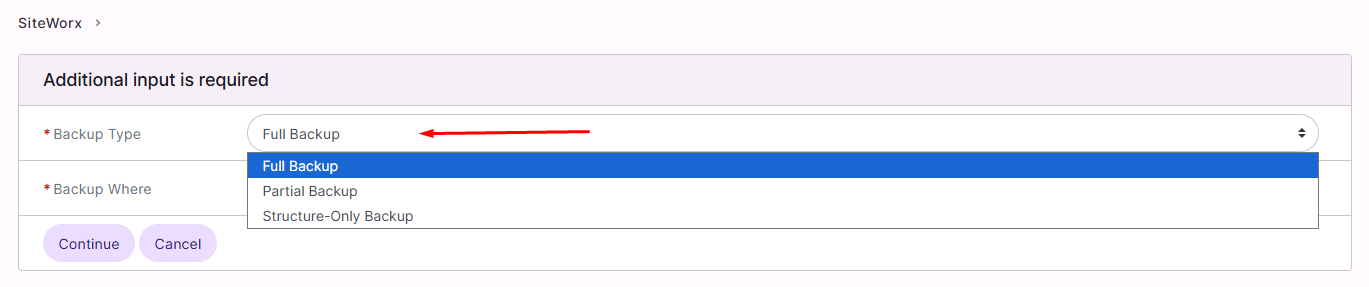
Step 2 – Choose the Backup Type
In the configuration window select Backup Type:
-
Full Backup: complete copy of site, databases, and configurations.
-
Partial Backup: copy of only files or only databases.
-
Structure-Only Backup: saves only the database structure.
Step 3 – Define the Backup Destination
Under Backup Where, choose where to store the copy:
-
Default Location: on the server (default location).
-
Local File: direct download to your computer.
-
FTP: upload to an FTP server.
-
SFTP/SCP: secure upload to a remote server.
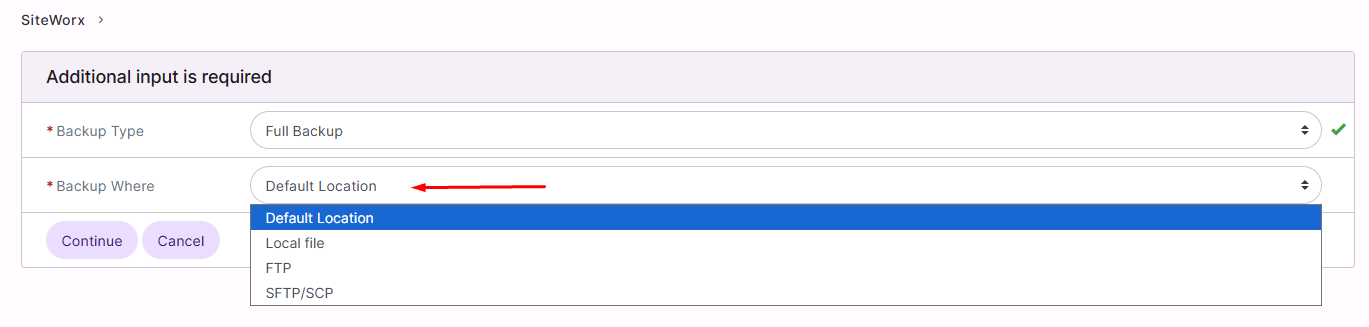
Click Continue to start the process.
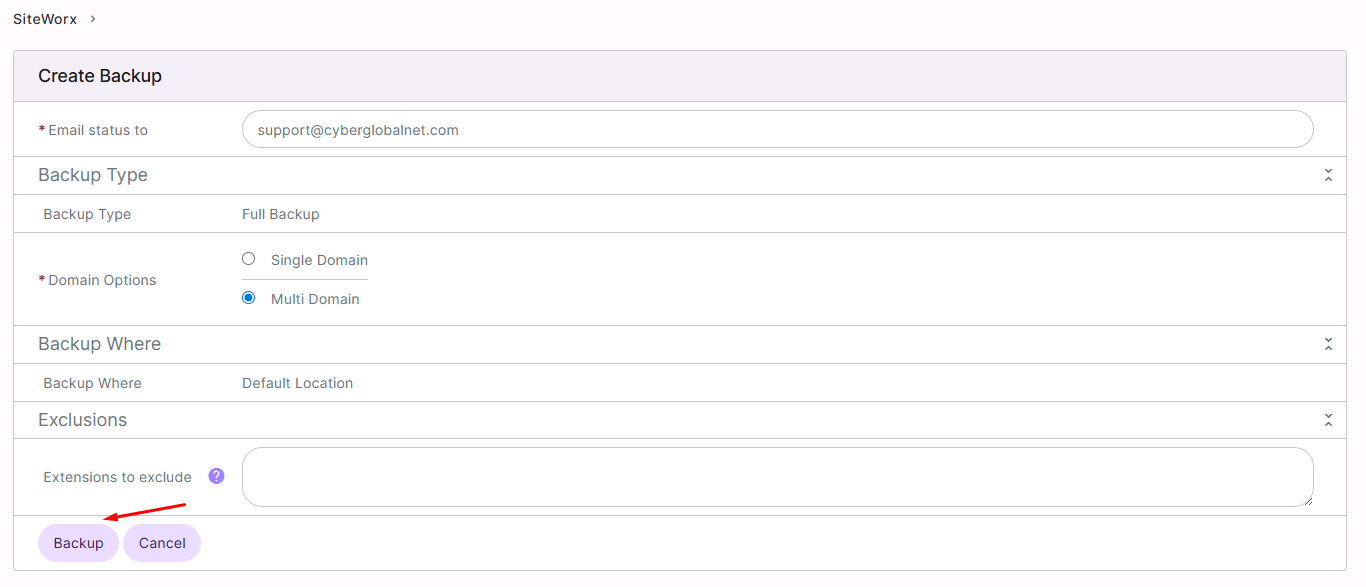
Step 4 – Confirm and Generate the Backup
The system will process the backup. Depending on the size of your site, it may take a few minutes.
Step 5 – Download or Manage Backups
Once created, the backup will be available in Backups → Management, where you can download or restore it whenever needed.
Recommendations
-
Perform regular backups to always keep a recent copy of your site.
-
Keep at least one copy outside the server (e.g., on your computer or cloud storage).
-
Always generate a backup before major changes (updates, migrations, plugin installations).
-
-
How to Restore a Backup in SiteWorx
Introduction
In case of problems or accidental changes, you can restore your website files and databases from backups. SiteWorx uses R1Soft Restore, which provides daily, weekly, and monthly backups that you can access and restore when needed.
Step 1 – Access R1Soft Restore
In your SiteWorx panel, go to:
Hosting Features → R1Soft Restore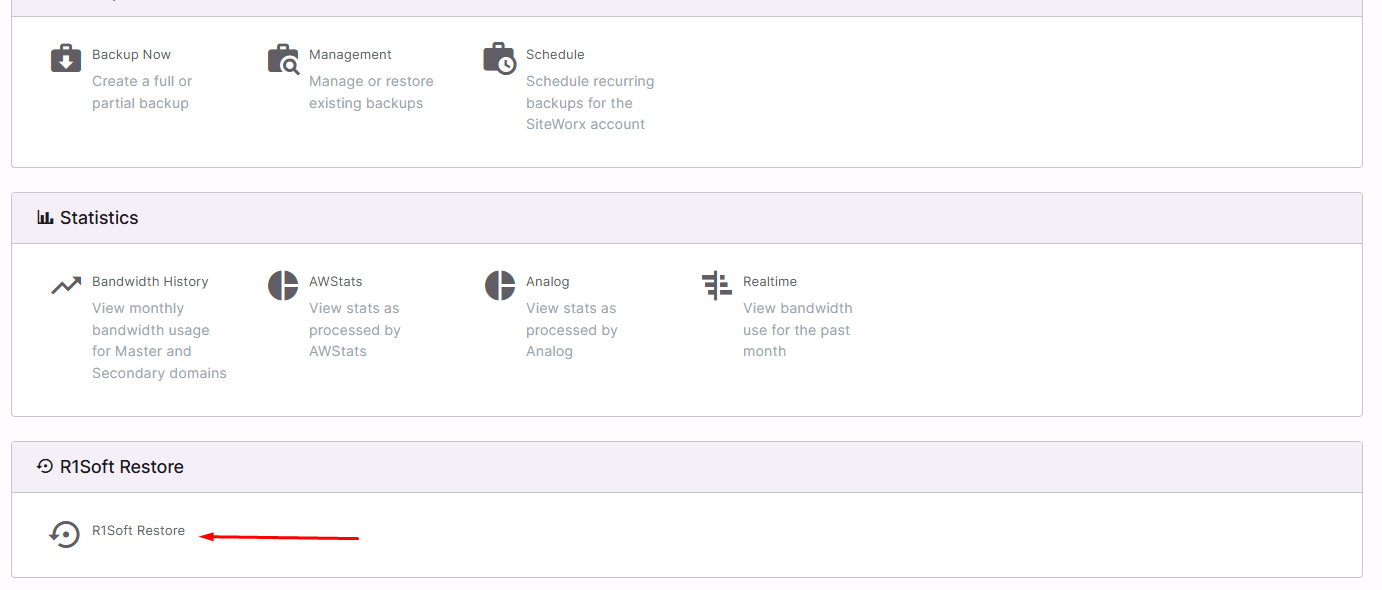
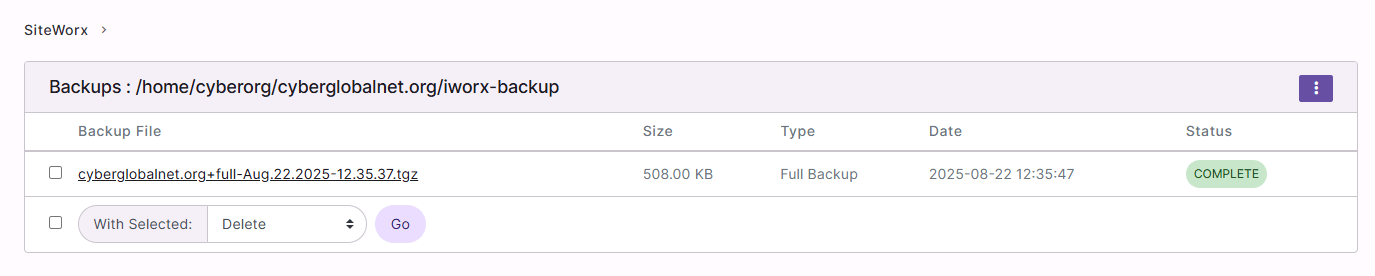
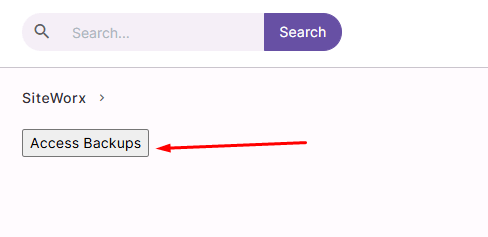
Step 2 – Access Backups
Click on Access Backups to view the available restore points.
Step 3 – Select a Restore Point
A list of backups will appear, organized by date (daily, weekly, monthly).
Choose the desired restore point and click the Send to Agent icon.
Step 4 – Start the Restore Wizard
The Archive Control Panel User Data wizard will open.
Click Send to Agent to start the restore process.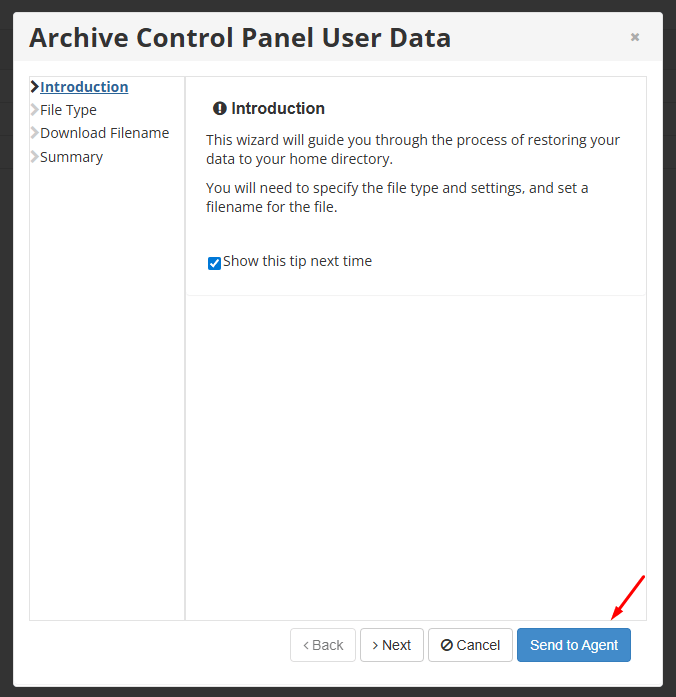
Step 5 – Confirm the Restore
The restore process will begin. Once completed, you will see a confirmation message indicating that the files have been successfully restored.
Click OK to finish.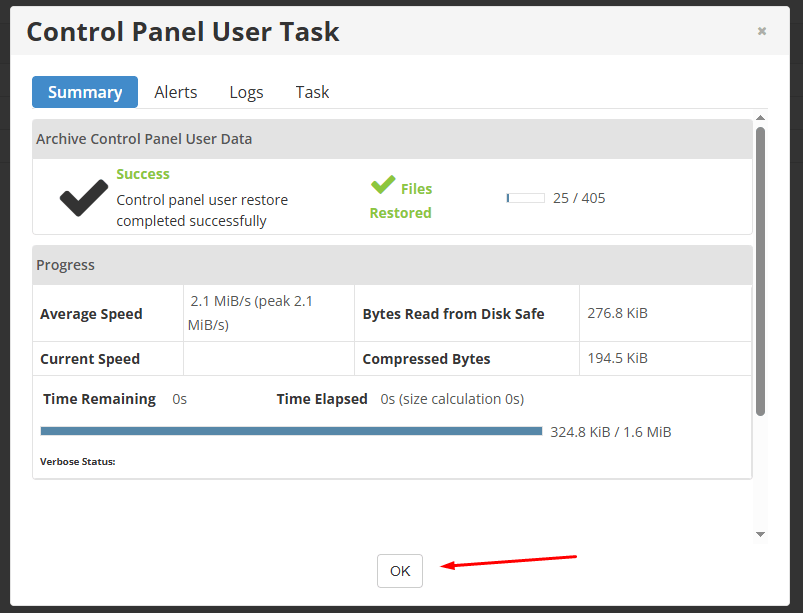
Recommendations
-
Always verify your website after a restore to ensure everything is working correctly.
-
Use the most recent restore point unless you specifically need an older backup.
-
Remember that R1Soft automatically keeps daily, weekly, and monthly backups, so you usually don’t need to create manual ones.
-
-
How to download a backup of my website
You can download a full backup of your website using Softaculous inside your SiteWorx hosting panel. Please follow the steps below:
Step 1: Log in to Your Client Portal
Go to:
https://manage.cyberglobalnet.com/client/loginIf you have forgotten your password, you can reset it here:
https://manage.cyberglobalnet.com/client/login/reset/Step 2: Access Your Hosting Panel
-
After logging in, locate your active hosting service.
-
Click on the service to expand the options.
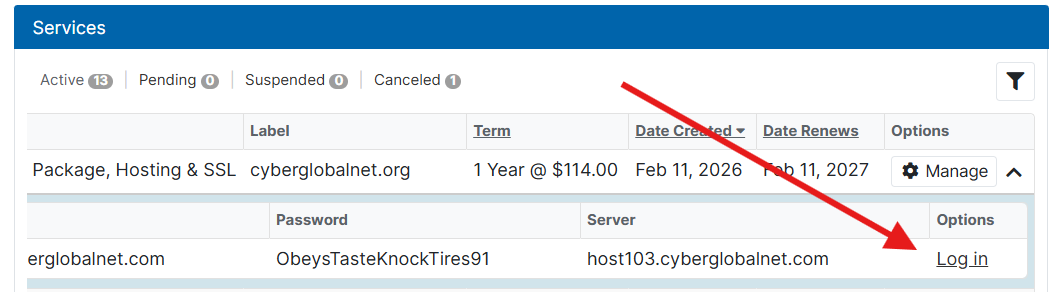
-
Select Log In to automatically access your SiteWorx hosting panel.
A new tab will open with your hosting dashboard.
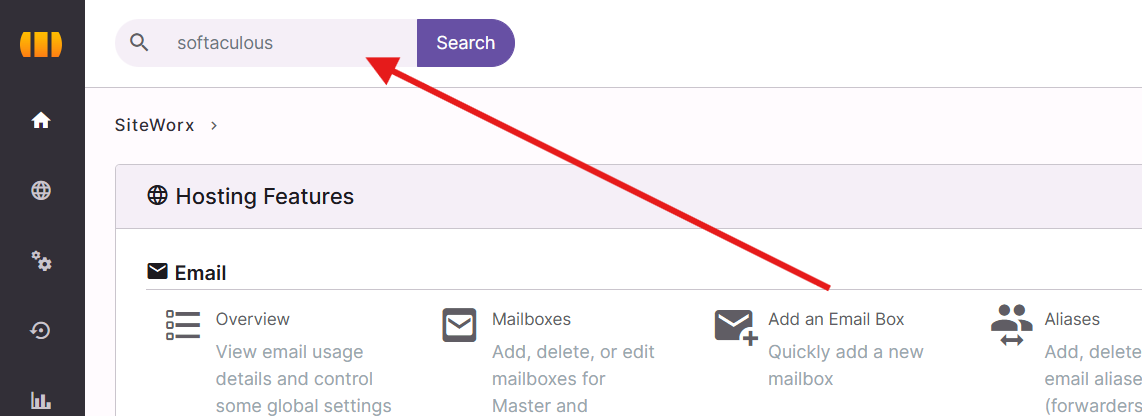
Step 3: Open Softaculous
-
Inside SiteWorx, use the top search bar.
-
Type Softaculous and click on it when it appears.
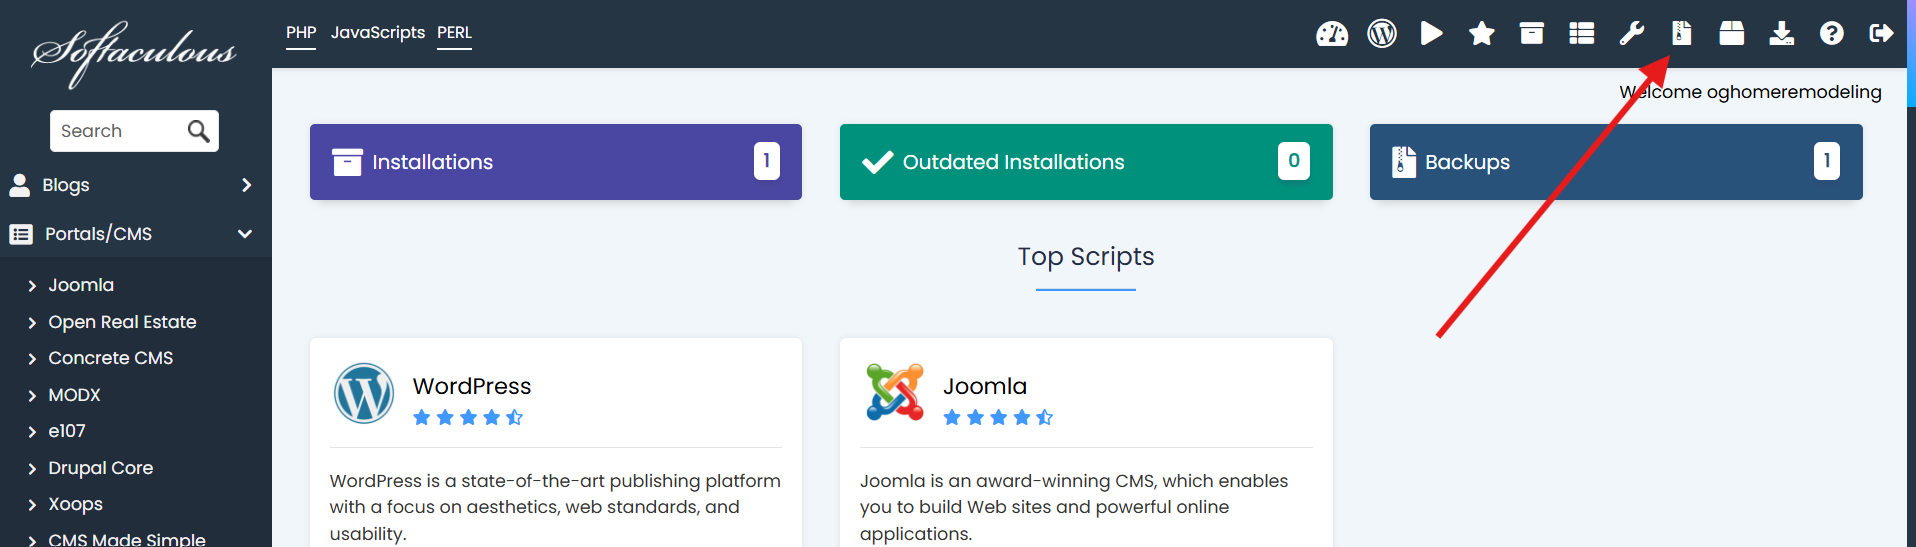
Step 4: Navigate to Backups
-
Once inside Softaculous, the page will reload.
-
Click on the Backups and Restore icon.
Step 5: Download Your Backup
-
Under the Backups and Restore section, locate the backup you would like to download.
-
Click the Download icon next to the desired backup file.
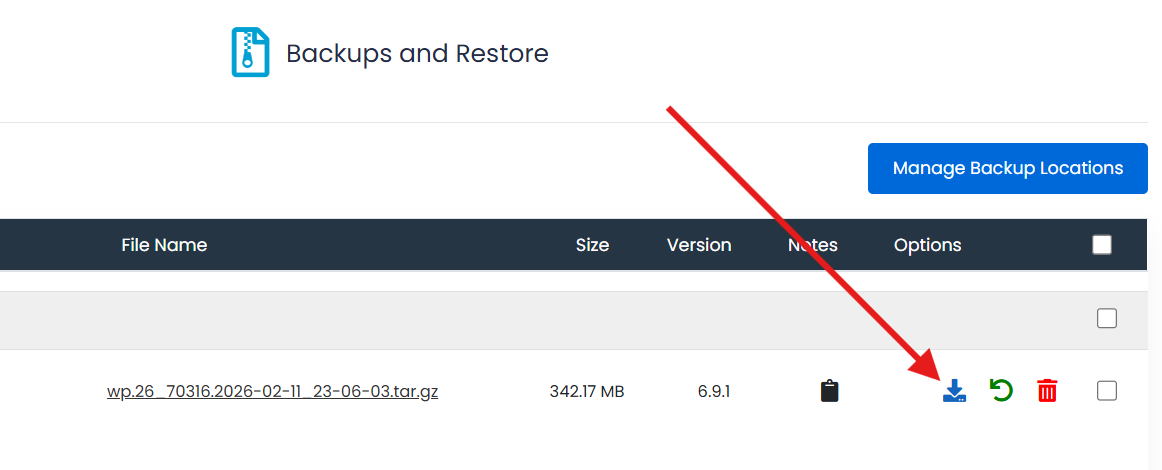
The download will begin automatically. Depending on the size of your website, this may take several minutes.
If you experience any issues downloading your backup, please contact our support team at
This email address is being protected from spambots. You need JavaScript enabled to view it. , and we will be happy to assist you. -
 Español